Showing posts with label gadget. Show all posts

Monday, August 10, 2020

week twenty one

This afternoon had me enjoying my new clips as I started binding my brother’s birthday quilt. I used these for the quilted hexagons, too, but I think where I’ve really been missing them is in applying binding. This will make it so much more pleasant to sew my way around the quilt. These are the perfect size for this task, not to big and not too small, and they hold things together with a very firm grip. 


I have to say I’ll be sorry to give this one up. This binding makes me giggle, and I’m enjoying the fact that I had enough of it to also get a good section of the backing covered in surprised minion eyes as well. And that minion flying the rocket ship just kills me. COVID is crap and I am bummed I won’t be going home for this birthday, but I am extremely pleased with the way my stand in is turning out. 

Friday, July 3, 2020

a festive fourth

Well here it is, my second wall hanging for the house. My Halloween pumpkin patch finished up rather quickly once we moved in, but it took longer for the next to come around. The holiday horses are still basted and folded...... 


I used this little piece of improv as the experimental first voyage of the quilting frame Dave got me for my birthday last fall. It took a bit of fiddling to set everything up, but now that the bits and pieces are assembled it should be quicker the next time around. I have to say, I think it’s going to be great once I get used to it. I’m very good at drawing, but less good at drawing while moving the paper instead of the pen. That is how this works, in contrast to a long arm where you move the needle like you do when you draw on paper. 


I had grand plans of doing a bunch of straight lines to echo different blocks, but decided to opt for a loopy all over design while I got used to driving the new contraption. It was a bit of a chore to get tension right - definitely had it right for two passes and then had to take out the next FOUR because of snarly thread on the back. In the end I put the machine back on AUTO and it worked out fine. I read somewhere that you needed to take it off of auto and ramp up the tension for it to work right. That seemed to work out in the beginning but I made a small adjustment partway through and BAM. Snarly thread. 


I found this great striped fabric for the backing and bought enough so I had plenty left for binding. Gotta love a stripe for binding. It also hides some of the imperfections from the machine quilting on the back, even with the white thread. That’s the side against the wall anyway, right?? Like I said, the quilt frame is going to take some getting used to. 


While it wasn’t the geometric coup I had in mind, I do think it’s pretty festive looking. The loops give it lots of texture and actually contrast with the highly angular patchwork pretty well. I suppose if you squint they could look like fireworks. And it’s done in time for Independence Day! Score one point for me. 

Sunday, March 15, 2020

pineapples in spring

Since finishing the last stitch on my Forest Fog knitted blanket I've been spending a lot of time in the studio cutting strips of fabric for my next quilt. So many strips! I am enjoying the counter height cabinet to work on for cutting; it's much easier on the back and shoulders than the card table. I also enjoy that I can clear off the top to work with large pieces of fabric so it isn't as difficult to maneuver yardage and cut width-of-fabric strips. Many of these were cut from fat quarters, but that linen on the side there was from a big cut of yardage. 


I am making a pineapple block quilt, my first. Mom got me a set of templates and a pattern book for Christmas, and I've picked out a pattern for a quilt to throw across our living room couch. I'm sure like all the quilts it will end up all over the house but the initial color choices were inspired by our living room. 


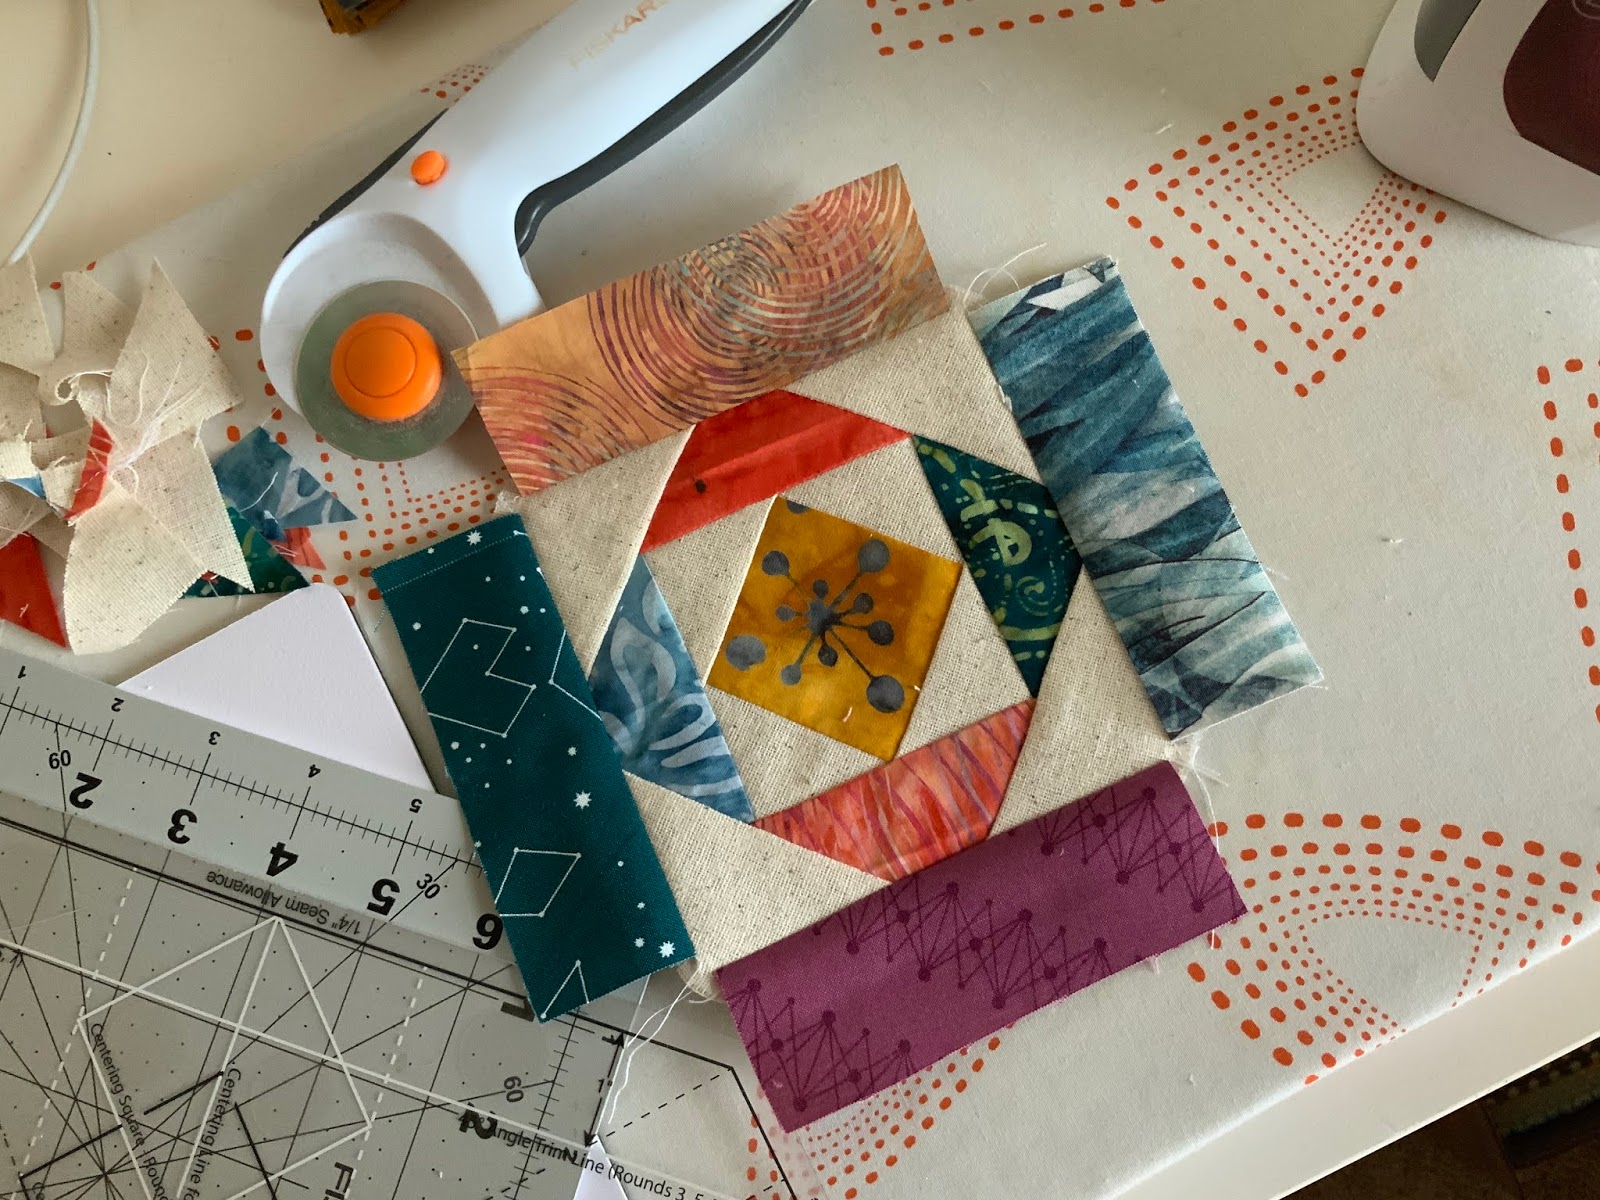
The template is pretty great as it takes what would be an otherwise very rigorous process of trimming and squaring up and making it super easy. This block is on round 4 of my pineapple, pre-trimming. 


All I have to do is line up the center square with the appropriate square on the template and trim all four sides and I'm all set to do the next round of strips. It's simple and easy to keep edges squared and the pineapple growing without getting skewed. I am very happy. 


I'm also using my cone thread holder for the first time. I've been quilting so much that I'm going through thread quickly. I've had a couple of larger cones in my cabinet for a while and was always meaning to try the coffee cup or travel cup thread holder, but never got around to it with a project I thought was big enough to try. In the meantime I treated myself to a relatively inexpensive actual thread holder, so I set it up in the new space. I wound 3 bobbins before I started this quilt, so I'm hoping I'll be able to sew for a while before needing to do anything with thread. I did increase the tension from "AUTO" to "+1" on the machine after sewing a few test lines to get the stitches looking good, but other than that I've had no issues switching to this set up so far. 


There is a lot of traffic between the sewing machine and iron/cutting area in making the pineapple block, but I'm going to try to figure out a way to chain piece at least a few at a time to make that a little less of an issue. Love how this first block came out - just 23 more to go!

Friday, September 27, 2019

a design wall at last

OMG this last Sunday Dave did a thing. And it's an awesome thing! I have a design wall in my craft room!! I'm still not sure where the sewing machine will end up, but what I do know is that I'm glad we waited to get any more furniture in here so we could end up deciding to do this. We had discussed how and where to try a design wall - do we use foam board from the hardware store, or try to get display boards from Staples, should it go over the cabinet on the other wall, on the closet, or somewhere else. In the end, Dave was very clever and just taped a couple of our largest moving boxes together. We covered it with a flannel flat sheet we aren't going to use on the bed anymore and put it on the biggest open wall we had. The bottom part is loose and that's because we just let the extra hang down past the boxes when we nailed it to the wall. Boom. Lightweight, pinnable if I need to, and the flannel is worn so it's nice and sticky. Also, free. So exciting.


I have always envied quilters and craft room pictures with great big design walls. Moving things around on the floor or in sketches is very good, but I don't think there's any replacement for being able to put the actual pieces up and really let them hang out (no pun intended) for a while. It seems like it can make the whole final assembly/layout process so much more thoughtful. For me that's always the "oh well let's just get it sewn together and see what happens" part. But now I have a glorious, huge, amazing space on my wall. For example, I thought I was going to just sew my churn dashes together to make a small quilt, but now I'm playing around with making it bigger.


It took me some time to decide what blocks I wanted to fill in with. I want this to be more of a traditional looking fall-ish quilt so I made some four patches and stuck with the darker colors, navy and magenta. I really wish I had some burnt orange to use instead of the magenta, but I am making this from my stash and I didn't think the bright peach would keep it looking like fall. So magenta it is. 

I also messed around with the orientation of the four patches. The one above makes some interesting secondary patterns where churn dash and patchwork block corners meet (that I would not have seen had I not been able to take a few steps back), whereas the one below is very different. It feels more traditional to me, probably because of the checkerboards. I also felt like the churn dashes got lost a little bit more, so I stuck with the first layout.


The issue I was having with the first option was that the parts were the four patches all met in the middle of each 12 inch filler block was very dark and heavy feeling. (The dim pictures don't help, but it was nighttime and I wanted to keep working). Those visually took over, but the way the background ended up framed the churn dashes really nicely. My solution was to take a brighter fabric, a yellow print from the Indie collection, and add a triangle to one square in each four patch where they met. This makes a little sparkly diamond at those heavy intersections and lightens things up a bit. I also like the way the on point square echoes the angles of the churn dashes. 


See? Already I'm finding this whole thing very useful for thoughtful quilt assembly. It's not quite what I had imagined initially, but it's fun to follow wherever whim is taking me right now! 

Saturday, August 19, 2017

the long and winding road

So much yarn! There is even more of that navy blue and forest green that remains unwound waiting for some progress to be made on the rather large projects those are destined to become. New, you say? No just newly wound. I buckled down and wound up a bunch of hanks that have been lounging around in the stash for a while. I haven't picked out projects for all of them yet but I found myself wanting to start one of my long planned projects, a shetland shawl from a book of traditional shawls I bought at Powell's on our last trip to Portland in 2015. That deep blue yarn is destined for that. I figured as long as I was winding up a couple of hanks already I would wind up some others and lower the barrier to starting projects with them by having them ready to go. 

Similar to finishing up quilts in progress helping me mentally want to plan a quilt again, I think the same can be said for having a relatively clean yarny slate. I've made so much good progress on whittling down my stash this last year and a half as well as finishing up works in progress. With the exception of the socks I just started and the aforementioned shetland shawl the only other WIP is my gray tree of life afghan. That's pretty amazing. 


The other thing that is pretty amazing is my winding set up. Last year for my birthday I treated myself to a ball winder and swift. What precipitated it was that I bought a lot of yarn all at once last September for making gifts for Dave's family's handmade holiday. There were so many people in the store that I didn't want to wait around for my yarn to be wound (and frankly I don't think they wanted to wind up seven large hanks all at once for me anyway). I figured I would go back in stages when I was ready to start different projects to have hanks wound, but ended up finding another solution.

With my birthday right around the corner in November I started researching ball winders when I got home with my new stash. It took me a few weeks before deciding on what to get, but I ended up dishing out some dough for a nice sturdy hand operated winder and a relatively inexpensive swift. Perhaps at some point I'll upgrade the swift but this ball winder is solid. Like my great grandkids will probably still be able to use it, it's that well made. 


It is really nice to have the ability to wind my own yarn, especially since a lot of the yarn I get now comes in hanks. It saves the winding time for both me and the shopkeepers when I'm buying from brick and mortar stores and is the perfect solution when I buy the occasional hank online. All told I wound about 3600 yards and it only took me an hour or so. Now for more stash busting!

Sunday, November 8, 2015

an ode to my new rotary cutter

Another treat from my mom's visit in September -- this little guy has been hanging around in my desk unopened while I finished up a bunch of knitting. Tonight I cut a few things for my three quilts I'm aiming to finish soon, and I LOVE IT. It's an Ergo Control 45 mm from Fiskars. 


My original Fiskars rotary cutter has seen lots of action and just doesn't keep the blade out anymore. It pops back in at even the slightest pressure. This version has a new action to lock the blade out that seems like it's quite an improvement. The blade is super sharp and cuts through multiple layers like butter. It's even way better than having a replacement blade in the old one. Don't know why, but there it is. 


Tonight I cut filler triangles for Samara's quilt and all the pieces for my grandfather's quilt and my hand hasn't even thought about hurting. Thanks mom!

Thursday, April 9, 2015

solid as a rock

Well, I finally did it. I bought color cards for solid fabric. I've been frustrated at my lack of solids hanging around my stash, and equally frustrated with the selection of solids at the fabric store I can get to easiest. I'm picky enough about colors that taking a chance on ordering online without knowing the color is not a great idea for me. So with this solution I can buy online with confidence that I'm going to get the shade I'm hoping for and take advantage of the sales and selection.


I got the Kona color card with all 303 colors on it (wow that's a lot of choice!) and the Moda Bella color card with something like 240. I think with a choice of 543 different colors I can make anything work, don't you?


I ended up getting both cards just to get over the free shipping offer limit, which I did by 5 cents. Go me. The reason being 1) I hate paying shipping, I'm happier if it's just factored into an overall higher price and 2) I also bought this:


That lovely stack is a fat quarter bundle of Mustang from Cotton and Steel. I've been holding out getting any new fabric for a looooong time, but this was on super good sale and how can I resist a fabric line with those colors, horses, and bees all in one great place? Exactly. I couldn't. PLUS perfect addition to the color card costs to get free shipping. Serendipity.


I'm looking forward to testing these color cards out on future projects, most notably I want to get some navy fabric for my Lonestar Hexagon quilt. Of course, that means I will have to consider all 20 of my options very carefully….

Tuesday, July 22, 2014

blocking block

I've had a little lace shawl off the needles since the end of May, and it's just been hanging out waiting to be blocked. I've also got a baby blanket I just cast off that's been added to the pile. This step always stymies me. It's my least favorite part of knitting besides the first row post-cast on but really does make a HUGE difference in the finished piece. Especially with a lacy project, blocking is essential.

Part of my issue is that I don't have a great place I'm willing to lay out a big project. The kitty would tear at anything on the bed or on the floor (or more likely, sit on it). As a result I end up blocking in stages on my ironing board. Second issue, I hate pinning. Seriously hate it. I get really caught up in trying to stretch a piece to the max but also not have those annoying little points from where the pins are anchoring the edge. Add to that the staged blocking and trying to pin to match up sizes and shapes along a whole piece and it's enough to drive anyone batty.

So I splurged on myself a little and bought a set of blocking mats and blocking wires! I've been thinking about buying these for quite some time, so at least it isn't an impulse splurge. The mats can be rearranged to suit whatever size/shape project I may have in line to give me plenty of room to lay everything out just so. And the wires should take care of at least some of my pinning problems (I'm looking at you, straight lines and smooth curves!).

(mats from Knitpicks)

I have lots of projects in the queue, and I'm excited for these new gadgets to come so I can try them out and hopefully wave my blocking woes a fond farewell.

As an aside: After researching blocking mats and wires, I have come to have a suspicion that my wool-based projects might benefit much more from wet blocking than steam blocking. A couple shawls of mine ended up disappointingly small and it has only just occurred to me that perhaps it was the blocking. I have a great handheld steamer so usually steam block everything. It works wonders with acrylics, but I wonder if I could get my woolies to stretch a bit more if they were soaked. I always see the fiber relax as I steam and it will hold shape after drying, but it appears soaked wool will stretch more than dry so a piece may start out already larger at the pinning stage. Hm… I may have just created a problem where none exists, but it's worth a shot on my Pacific shawl(ette) at least, as the fiber seems to have relaxed and shrunk back down over time. Thoughts?

Tuesday, March 26, 2013

(Puttin') on the fritz

My sewing machine certainly has seen a lot of action this last year. Compared to years past when it has come out only occasionally,we've been through a lot together the last 12 months including my first quilt, a couple of wedding quilts, birthday gifts, holiday gifts, and "gasp" even pajamas. I've got lots of projects planned for this next year. I love this machine. It's my happy place.


What I don't love is how the bobbin winder has been on the fritz lately. Usually I can wind my bobbins by popping them on this post, pushing it to the side, and cranking down on the foot pedal. 30 seconds later I'm done. Lately when I shift this over and start the foot pedal I get maybe two or three turns around, my needle is still moving up and down instead of staying still, and I get an error code and beeping which stops the whole party. This happened maybe once before but fixed itself mysteriously. What had been an intermittent problem has now become standard, I'm afraid. I've thoroughly cleaned out the bobbin case, though it makes no sense that the two would be at all connected. The wisdom of internet troubleshooting has failed me.


See the irritated bird behind the bobbin winder? Yeah. I thought I had it fixed last week working on my tulip pillow when I realized on the decorative tulip stitch setting I could wind my bobbin just fine. Alas this last weekend proved that theory incorrect. Beeping on any decorative stitch, including tulip #32.  Something is up (I think it's a mechanical problem, not a computer issue) and I can't open up the machine to see what it is. And winding bobbins by hand is getting old. 


So Sunday Dave bought me this. By bought me this I mean I went out and picked it up while on a tangential mission to buy batting at Joann's. But really I only got it because when I was first having this problem and we were out shopping, he saw this and asked me why didn't I have one. Truth is, I never really understood the need for it. But now I have a need. Getting around my problem may not be the intended purpose, nor do I want to ignore this and stop trying to fix the issue, but really right now I just want to sew. I've got birthdays and babies to sew for! The needle stops for no glitch! (Those of you who have read back in time may realize that my nieces birthdays are in April. Auntie needs her machine to work.)


I haven't tried it out yet, but it looks promising. And it folds up all nicely into this little bobbin winding spaceship. What a helpful little spaceship.

Thursday, March 29, 2012

Made for walking

I'm excited, my walking foot came! I've machine quilted before with my regular foot on my sewing machine, but after getting some good advice (and reading a lot of opinions about how great they are for quilting) I splurged and bought a walking foot.


I've been waiting to start quilting my Flora Fence project until this little gadget came, so now I'm ready to go! I also discovered yesterday while reading the manual to my machine that there is a 'hand quilting like' stitch. I'm going to do a test sew tonight to see what that's all about. I thought about hand quilting, but when I tried it recently on my first kitchen mini, I did not find it at all relaxing and ended up taking it out. I think I'm too a) impatient and b) obsessive about even-ness. This is the worst combination -- I go fast and then am unhappy when the stitches are wonky.

Hopefully I can get this quilted in a reasonable amount of time so it's done in time for us to enjoy the spring-i-ness of it while it's still spring!