Wednesday, March 31, 2021
Tuesday, March 30, 2021
Storage ottoman
This is a cool thing. After we got my comfy corner chair in the bedroom, Dave and I knew we wanted an ottoman to go with it. I had thought about one of those chunky yarn poofs, but in addition to them being basically huge cat toys they are also EXPENSIVE for what they are. I could have tried making one but instead Dave came up with another solution - we could make a storage ottoman together!
We started it well before my surgery in February and he put the finishing touches on by the time I was able to make it up the stairs and want to sit in the chair afterwards. It is the perfect height to keep my legs out straight in front of me and to support the sore and achy spots.
We used oak boards for the body and I added foam and some amazing scrunchy velvety fabric to plywood for the top. The top didn’t turn out as squishy as I was thinking, but it is firm and supportive which is nice. Staining took some time as well as finding hardware we liked. These handles are 100% necessary because it is a heavy thing! I’m not sure how Dave would have gotten it up the stairs otherwise.
For some fun and to hide the plywood top I used spray adhesive (which had not so great success, but it’s on there) to put this cute mischievous kitty print inside. We framed it with some more wood so the staples and edge of the fabric are covered. Down in the corner there you can see the felt tabs Dave added to avoid the top thunking closed. Even with the two hinge brackets we used it still wants to close pretty quick because it’s a bit… substantial.
I lined the bottom with a heavy duty felt that makes it look quite polished. In addition to being a great thing to sit on to put on shoes, to rest legs on post surgery, and to generally enhance chair reclining comfort, it is a great place to store all of my physical therapy paraphernalia! I’m still impressed that my foam roller fits in there perfectly. It certainly wasn’t purpose-made, but looks like it. Go us.
Monday, March 22, 2021
horse show time
This past weekend, roughly a month post-surgery, our barn had a horse show. I was very bummed to not be able to participate with Bandit - it was one of my goals for the year before all of the drama - but Mom and I got involved by making some very cute prizes for first place.
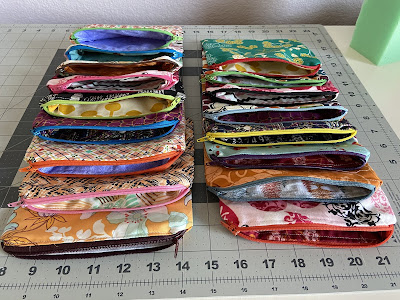
These zippered pouches were incredibly fun to make and play with color combinations. All it took was a few squares of fabric scraps and a short zipper from my big stash of colorful zips. I didn’t do anything fancy for the zipper installation. There are no tabs that cover the ends, just a quick and lazy install that turned out with the slightly curved tops where the zippers tuck into the seams. They look great and were low fuss.
My favorite part was pairing up the inner and outer fabrics. There are certainly some unconventional combinations in there that look just fab. I wanted these to be fun prizes, so instead of just an empty pouch, we went in search of some puffy peppermints that most horses I know love. We filled each pouch to the brim with peppermints, zipped them closed, and displayed them all together in this bowl at the prize table. Each person who won a class got a pouch! Everyone enjoyed the show and also loved the treats.
Tuesday, March 9, 2021
saddle up
Here’s a fun thing I finished and promptly forgot to write about. I haven’t taken it to the barn yet, but I did get some photos of it in the garage when I brought my saddle home for conditioning back in January. February this year was so silly that here we are in March already.
It’s another mostly unnecessary horse accessory, this time for my saddle instead of the horse. I say mostly because the new stirrups I bought are quite heavier and larger than my previous pair and this stirrup cover should definitely keep them from scuffing up the sides of my saddle. Necessary? No, given that my saddle lives stationary on it’s own rack at the barn. Nice to have? Totally, because it does occasionally get transported to and fro in the car, and I suppose carrying it from rack to horse? Anyhow, it’s fun.
It was an interesting thing to try to make off the cuff. I’d been seeing some online marketed by intrepid college students who make custom fully fleece ones. How hard can it be, says I. The fleece, one figures, is great against the saddle for softness and anti-scuff properties. I was skeptical about it as an outer layer though because barn dust, which is everywhere. I tried mine out with a black linen outer layer that I think should at least be wipe off-able in comparison to the fleece. I’m aware it will still get dirty, but at least it will be under my saddle cover most of the time so it won’t be getting the full barn dust treatment. Though, it is already full of cat hair thanks to Newton’s aerosolized fluff so maybe that’s a miscalculation. The black did seem a little less “loud” than making the whole thing out of the print though. Don’t want to attract any attention!
I used a horse print fleece print from the stash cabinet on the inside and also ended up adding it as a gusset for the stirrup pockets. Originally I thought I’d measured long and wide enough to be able to just sew a rectangle of linen to a rectangle of fleece, fold up the ends, sew them down to make pockets, and call it a day. Not to be. I mis-measured, even with the buffer I thought I was adding, and the stirrups wouldn’t fit. So I just took four rectangles of fleece and sewed them on in such a way that they form the sides of the stirrup pockets and problem solved.
I think in retrospect I forgot to account for seam allowances, not too sure what happened. That’s what you get for designing on the fly. (Pretty sure it was also super late at night when I was sewing). I do still think that with proper measurements the first, much simpler and faster, way should be possible. I avoided taking it to the barn this muddy season; no reason to tempt fate. When I eventually get around to using it I think I’m going to smile whenever I see the ponies on the inside.
Subscribe to:
Comments (Atom)


