Monday, June 29, 2020

week fifteen

Having finished my sweater this past week, I was faced with my only knitting project being joining all of my color work patches. I was not (and am still not) looking forward to that, so what's a knitter to do? Start a new project of course! I wound these cute little cakes of yarn while on a video call with my mom. We were both rummaging through our craft supplies looking for new things to work on. We are so in sync that we were between projects at the same time! Rummaging through my stash led me to these and reminded me of the color work mittens I had planned for them. These are more goodies from the Stitches West marketplace last year. I considered just working from the skeins since they were mini skeins, but her pragmatic "just get your swift out and wind them, you'll thank yourself later" was enough to get me to winding. As ever, she was right.


This color work is challenging but fun. There are just a few rows where I needed to manage three colors, and I learned a couple of new and flashy techniques: the Latvian braid and that fancy hemline. As of this posting I've made a bit more progress up the hand and it's looking really cool! This past week was full of knitting and I anticipate this week will see a few more inches of these come to be.


As I write this, things are looking like we may be taking a step back on the COVID front. My understanding mid week was that the county would be issuing a new order that would reflect increased relaxation of our lockdown, but it seems like this weekend the news was all about rising case numbers again. We may be headed for a step back, or perhaps just a delay in continuing to open. Fingers crossed that we can get a handle on this and make some progress soon. We will see where the wind blows this week. 

Thursday, June 25, 2020

Greenwood sweater, finished

My sweater is finished! Of course, not without a little bit of drama. I realized while putting the needles away that the one I used for the body was a 4 mm (US 6) rather than a US 4. The whole sweater. OMG. The gauge was correct anyway so I guess that’s what really matters. Actually I did use the correct size needles for the arms, and when I compared the body to the arm there wasn't too much difference but I could tell the fabric on the arms was slightly tighter, not surprisingly. I took a deep breath, complained to Dave, then let it go and blocked it to the measurements. And it came out pretty respectably. 


I messed with the fit the day after blocking and ended up being quite successful. What the issue really was, I’m sure in part because of my needle “oops”, was the armhole/neck area was a bit saggy. I took each raglan seam and did a mattress stitch up the two knit stitches between the decreases (got that trick from https://fringeassociation.com/2015/01/20/basted-knitting-or-seaming-a-seamless-sweater/). That gave a bit more structure to the shoulder area.


The photo above shows the inside of one of the shoulder seams where I've made the correction on the left raglan line and not yet on the right. The texture in the middle is the slip stitch faux side seam. Below is the same section of the sweater right side out. The left raglan is narrower by a stitch but doesn't look at all unusual. Importantly, it is significantly less stretchy along it's length so the shoulder doesn't sag down under the weight of the sleeve and body. 


For the neckline I did a crochet slip stitch all the way around starting at a shoulder seam (that idea came from https://biscotteyarns.com/blogs/knitting/how-to-tighten-a-loose-neckline-after-it-s-finished) I did just the back and two shoulders first as suggested in that post, but then went for the full circle after trying it on again. For me it keeps the neckline from stretching out and off my shoulders. It is still a pretty generous boatneck, 12.5” wide or so. Below is a shot of both the raglan seam correction and the crochet along the neckline. Because it isn't a seamed neckline I tried to do it a few stitches down from the bound off edge so the neck would still roll. It took quite a bit of fiddling and patience but was totally worth it for the extra help it gave the shape. Thank you to the adventurous ladies who came before and shared those solutions to what must be common problems!


I bought this yarn and pattern at Stitches West in February of 2019 from an independent dyer in the marketplace, Greenwood Fiberworks. She had a red/pink version of this sweater on display in her booth and I am proof that it helped her sell some of her lovely yarn! The yarn is a wool/yak/silk blend and was nice to work with and had a lovely drape in finished fabric. The silk gives it a little bit of extra fancy without being shiny. I remember spending quite a while in her booth considering all of the amazing colors before settling on these greens. I really liked the medium green in the center and kind of worked from there. I thought about playing up its aqua tones but ended up deciding a green sweater would suit me nicely. 


The original pattern is not written with stripes, but the dyer that I met made this modification and shared it. It didn't necessarily net her anymore skeins of yarn sold, but I think that was a clever way to appeal to those of us that like to make shawls with multiple colors. It's a gateway sweater of sorts. Indeed, this is just my second sweater I've ever made and I will admit to being intimidated but intrigued when I walked away with my bag full of yarn and the pattern in tow. 


I am super happy now that I fixed my problem areas. It’s a very forgiving shape on me and I love the hemline design. All those short rows are worth it! I remember when I started out the short row sections seemed like they would never end. It was easy enough, but I was definitely counting the inches until I could stop purling and get to exclusively knitting in the round. I am really proud of this sweater not just because it's another project off the needles, and a significantly large one at that, but also because of the adjustments I was able to make to the fit. I also think the color combination looks fabulous and I'm looking forward to some crisp autumn days so I can drink a cozy cup of tea on the patio in this. 


I know I will always think of this as my "quarantine sweater" because I started it a couple of days after the county officially issued a shelter in place order to prevent COVID-19 spread back in March. As I cast on I remember thinking it would be a good thing to occupy me while we were both full time at home and wondering if I would be able to finish it before it was over and we were back to being out and busy... we are not under a complete lockdown anymore, but there is still a long way to go. 

Pattern: Hold Sway Sweater (my Ravelry page)
Yarn: Greenwood Fiberworks Yakity Yak in 'lime', 'seafoam', and 'pine'
Needle: US 6, US 4, US 3, US 2.5

Monday, June 22, 2020

week fourteen

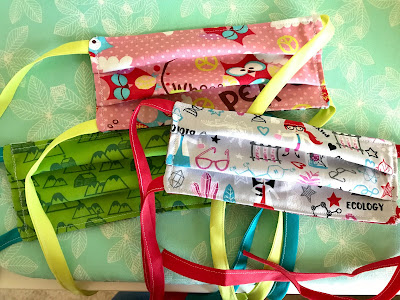
As masks have become required apparel in pretty much every situation when we leave our house, it was time to add to Dave and my respective wardrobes of one. We’ve multiplied up to four each now. If I’m honest it is pretty fun to pick out fun prints and color combinations and I’ve come to love my husband even more for having the humor and personality to wear them. I found some great flamingo and science fabric for me, and got some sushi and camping prints for Dave.


I’ve mainly been sticking to the tie back masks because I will get rubs behind my ears just from thinking about putting elastic back there. There have been times that it would have been really nice to not have to stop and tie up, though, so I made each of us one with elastic for those quick on/off situations. For those I used a pattern that was super simple to make from a couple rectangles of fabric. The pattern I’ve used most is one my mom shared with me and requires the extra step of tracing a template out and a few more seams to get the face-shaped mask. Both work just fine on us. 


For the tie backs, I’ve been using Wright’s double fold bias binding. They’re pretty inexpensive and come in lots of cool colors. The real bonus is that they are already ironed. I could (and probably will) definitely make my own ties from strips of fabric but the appeal of not having to iron those long skinny strips is so great. I did goof on the purple binding, though. Notice how it’s much skinnier? It’s important to make sure your package of bias binding says “extra wide” double fold. To be perfectly honest, the skinny one worked out just fine but I think it has more grip on my head if it’s the wider tape. 


My first ties were kind of ad hoc and pretty random based on the length of the strips I had in my stash already. There was pretty much no thought that went into it. After looking at several patterns and their approaches I’ve decided my go-to is this: use a 9-inch strip and tie into a loop with a square knot; hide the knot in the side channel on the mask; use an 18-inch strip on each side and attach to the loops by folding over a small tab and sewing it down so it loops freely over the first piece. The side loop provides some pull back both “up” and “down” on the sides so the mask doesn't bunch up weird and the fold-over tab attachment approach for the side ties means they can move up and down as they need to in order to fit best with whatever hat/ponytail etc. it has to get around to tie securely. It also means you use 1.5 yards of the binding for each mask which gives you 2 masks from each 3 yard package. 


This set here with the double ties is for a friend’s daughter. She wasn’t feeling very positive about wearing a mask as she gets to go out into the world a bit more in the coming weeks, but said if she could have one that was basically the same as the ones her nanny wears then she’d try it. Ta da! They took more binding, more like 2 yards each, but turned out super and were quick to make as well. These ties are sewn directly into the seams of the mask. I’ve also seen versions where the binding is sewn directly across the top and bottom of the mask to enclose that seam, too. I’m hoping these will make wearing a mask a little more approachable, and I love that I can share my girl science fabric with her. 


Dave and I make quite the pair when we are out and about with our bright fabric faces, but why not try to make this as bearable as possible? The way I see it, at least we can each get a chuckle together as we don our masks and step out of the car or peek around the grocery aisle to recognize the sushi face at the other end. 

Thursday, June 18, 2020

order from chaos

When life feels a little out of control, I like to find some order somewhere. Whether that’s making up the bed, doing the dishes, putting away laundry or.... assembling a quilt. I tried convincing myself that I wanted to sit down and work on my sweater but instead I ended up in the studio again chugging away at the sewing machine. It turns out that I didn’t have to trim much, a pleasant surprise. The cock’s comb blocks were ever so slightly smaller than the 10.5”  they were intended to be - about 10.25” - so I threw caution to the wind and started assembling blocks while eyeballing a scant seam on one side and an accurate seam on the other.


It’s actually quite nice the way the blocks come together because the duck and duckling blocks (the ones that look kind of like churn dashes) have a lot of points in need of monitoring as you sew, and the scant seam on the cock’s comb (patchwork square in the center) essentially made it so it’s single edge point was never cut off. So, even if the assembly was a little wonky, the points all worked out and everything was pretty even in the end. Phew!


I’m behind there somewhere trying to hold up the gigantic top while showing it off to Dave last night after I finished the last big seam. It’s 70 x 90 ish right now and there is a pieced border yet to come that will add 5 more inches to each dimension. I’m not sure yet if I’m going to do the other two borders. It’s not quite the largest quilt I’ve made, I think that distinction belong’s to Samara’s hexagon crazy quilt, but it’s pretty big. It’s going to be a great bed quilt when it’s done.  

Wednesday, June 17, 2020

bonus wall hanging in progress

Well this feels pretty good to get done, or rather assembled into almost doneness. My little HST scrap blocks have been hanging around on the wall for a while waiting for me to decide how to finish them. I knew I wanted a wall hanging for the upstairs loft, I just wasn’t sure where to start. I got the idea of a random arrangement of the blocks from oh so many inspirational modern quilting examples I’ve seen. The problem? How do you get it to seem random without pulling your hair out? 


The answer to some extent lies in “just start” and the rest in serendipity. I started out with my favorite block, the on point pinwheels, and sashed it with jelly roll strips of white. Then I assembled some of the other blocks and just started playing around with the background pieces I had, cutting strips and chunks as I needed them and working by section. There’s a bottom section, a top left, and a top right that are all pieced into great big rectangles that were then assembled together. I added a couple more jelly roll strips on the right and bottom to make it a little bigger and voila. It’s just a little bit longer than the pumpkin wall hanging I made for Halloween, so I know it will look great on the wall where I’m planning to put it. Now the problem is figuring out a backing.


I could piece it from the leftover jelly rolls, but I kind of want to use those in other projects. I’m thinking another pillow cover and maybe something festive for Valentine’s Day. The issue is I don’t have anything that appropriate for the back right now. It might be time for a quick trip to Joann’s again; they had a lot of super cute patriotic prints the last time I was out! 

Monday, June 15, 2020

week thirteen

We made our first foray out into the broader world to go visit some friends on their patio while socially distanced this weekend. We did a similar thing with our neighbors yesterday evening, sharing stories over the rosemary hedge between our driveways. We had a couple of calls with family and friends back in the Chicago area, too. It feels good to reconnect with people. 

The rest of the weekend I got a lot of knitting done, but mostly I was chugging away at the sewing machine. I got so much done on this quilt. As of this evening, all of the blocks are done! How very exciting. This second block, the cock’s comb, was a bit more challenging to piece because of all the quarter square triangles with their bias stretchiness. I did manage to get them under control with the help of a good hot iron (no steam!). If I had one major criticism of this pattern I’m following it would be that there is no note of what size the block should be after each “round” of triangles being added to the central four patch on these blocks. I suppose I could have calculated it, but lazy. It would have been nice to trim at each step to make sure the final size was right without any suspense. I think they’ll be close. 


With all of the blocks done, I just had to put some up on the wall to see everything together. It is amazing to me how different they look when they are combined. It’s looking so cool! I have border bits left to piece, but before that I think I will do the trimming and squaring of these. With 63 blocks, it’s gonna be a lot of trimming. I have learned this lesson well this past year, so I’m not skipping it. Especially given all the points I need to try to line up I think a good trim and square is absolutely required. They should be 10 inches finished, so hopefully most of these will find their way to 10.5 inches or close to it. 


At some point I suppose I’m going to have to start quilting all the tops I’m making. Hopefully Dave and I can get my frame set up soon so I can start experimenting!

Friday, June 12, 2020

a quilty stand-in

In case I've been giving the illusion that I'm organized, this is basically what my planning process looks like. Actually, it was much more chaotic before I curated down to the fabrics I would actually USE in the quilt. There were fabric squares and yardage all over the place and much hemming and hawing over whether or not I'd chosen a good pattern. Forget the card table, the floor is where it's at. 


And here is the fabric that started it all. While we were out last weekend exploring our newly reopened Joann's in search of quilt backing for the two tops I've got completed, I came across this amazingly cute minion print. My brother is a minion fan - like his car is yellow and named Kevin. He's turning 40 this year and I am incredibly bummed that I won't be traveling home to celebrate in person. I'd been turning over the idea of sending a quilt stand-in instead and seeing this made me decide it was definitely a good idea. These little dudes are going to be the backing fabric. 


I found a neat inspiration pattern online that was very geometric and looked like it was really well suited to solids. I did think about buying all new fabric but challenged myself to search my stash first. It wasn't at all straightforward to find masculine fabrics in my menagerie of flowers and cutesy prints, but I am quite happy with what I came up with. He likes orange so there needed to be some of that, and definitely yellow to minion up the front, then I just sort of played around with options until I decided that the blue ikat print from Amy Butler's Lark collection would be fussy with regards to orientation of the HST blocks but totally worth it to tie everything together. It's got primary colors in it that will make this bright and fun, like Kevin the minion. 


I didn't want to do a white background and that was all I had a lot of in my stash, so back to Joann's to search out a good gray. I bought them out of medium gray Kona (only 4 yards, don't judge) with the expectation that I will find other good uses for the extra yards. I do have a big quilt in the works and another one already planned and on the shelf, but these fabrics were calling to me. It was the work of less than an hour to get them all cut into squares and ready to go. I am feeling so inspired by the bright colors and the geometric design, I can't wait to get started! 

Thursday, June 11, 2020

piecing in the heat

There's been a lot of progress on this bright and summery quilt I started a few weeks ago. It's been so hot outside that I haven't spent much time in the garden during the week other than the minimum required to water it and peek at all the growing things. Also having all the pieces sitting by the sewing machine in that handy little basket I made really helps. I've used bags before, but the visual aid of seeing what is IN the basket tips the scale in favor of "do this now". Each day this week I've managed to spend a significant chunk of time with the next set of blocks. 


Many seams and bobbins later, I have 20 of these duck and duckling blocks done. Added to the 12 others I have done and I'm halfway through the blocks! The color combination is growing on me more and more, and I am really intrigued to see how the different blocks will play together when they are assembled. I'm finding the construction satisfyingly complex but approachable. I am learning patience with sewing triangles to things without stretching biases and the importance of pressing and not ironing. I am also learning that I have a limit to how long I can sit in the chair in front of the machine. Obviously the answer is not breaks, it is a comfortable cushion. The search begins. 

Monday, June 8, 2020

week twelve

I’ve been much more inclined to play with fabric than yarn lately and that’s ok. My creativity has been going through streaks where I do a lot of one thing and then switch. We’ve been in the midst of a heat wave here and somehow working with yarn just hasn’t been appealing. That said, I haven’t forgotten about my sweater. I’m at the point where the sleeves are added and progress is slow but true. One sleeve is done and the second is getting there. 


It’s basically been three months of quarantine at this point, and I’m still thinking of this as my “quarantine sweater” as I work. We are starting to see opening happen in phases (dining on patios! retail with masks!) but are still pretty much limiting what we do outside the house on any given day. I’ve been so impressed with the adaptability of all the businesses we ended up in over the weekend from the farmstand to the coffee shop. Everyone is doing their best. I’m sure we’ll be inching back to opening up just like I’m inching towards the end of this sweater, in fits and starts. But a little bit of patience goes a long way. 

Wednesday, June 3, 2020

red white and blue no. 2

Getting back to my red, white, and blue fix for a minute... I worked quite a bit on this pillow last weekend. After finishing the first one, another was sure to quickly follow. I've got two of these big pillows, so I'd like two thematically similar covers.

This time I dove into some of the books I've got on the shelf in my studio. I looked at different pillow patterns and quilt blocks and ended up picking a block out of my Shape Workshop for Quilters book that worked out great with the jelly roll strips. I had to make just a few simple cuts, a few sewing lines, and I had blocks in no time. It was pretty satisfying.


I paired two blocks with two large squares of white to make a pillow sized (24 x 24) piece. The quilting was partly done by machine and partly hand stitched. I had intended to do it all on the machine but I had no red thread! I actually really like the way the hand stitching stands out so I'm chalking that up as a lucky break. The stitching lines are just to either side of the white squares in all directions. I like the way the resulting "plaid" on the white space echoes but does not match the strong geometry in the pieced blocks. 


The backing is from my random large cut of gray canvas fabric with a blue zipper and navy stitching. I used a couple strips of one of the navy prints to make a binding and attached it as I would normally do a quilt binding (in contrast to the last pillow). 


It was so hot again today, but I did pop outside to snap a few pictures and test these out on our new porch chairs. While I do love the pair together, I think they are too large for the chairs! I guess they will stick around inside on our living room couch like I originally planned. For now they're folded up and waiting for July. 

Monday, June 1, 2020

week eleven

We are still in (some form of) quarantine, but the world still turns and birthdays still happen. After finishing the fabric basket before my friend's birthday I worked on other things until last night when I realized I would be up in the area of her place today and could stop by to drop off her gift. But what to put in the basket? Brainstorming time!


Here's what I ended up with. Those two kitty cat squares were recent cuts from the great scrap jar clean out and have ended up as lavender sachets. I still had lavender from a trip to Aix forever ago, and it still smells quite strong! Amazing. It took literally ten minutes to sew, fill, close, and attach little buttons on each of those. It was tempting to make all the sachets to fill the basket, but it's pretty big! Plus I happened upon some cotton yarn that I've been planning to make dishcloths out of. (In fact I'd already broken into the skeins during week one of this whole quarantine thing.) I've made her some before, but a refresh every now and then isn't a bad thing is it? That took a little bit longer, but Dave and I watched some woodworking YouTube on the couch together as I crocheted. The ends were taken care of this morning. 


The unicorn I also made a few weeks ago in preparation for this particular birthday. She is made of the leftover pieces from holiday ornament making with my nieces and my mom. All it took was a few dollops of hot glue and some marker and she was all set. My friend is super into unicorns right now, so this was received well. It was all packed up in the fabric basket and popped right into a nice gift bag for some socially distant gift giving and an air hug!