Showing posts with label modification. Show all posts

Monday, April 20, 2026

a quick mushroomy bag

I have been watching a lot of knitting YouTube lately which means I have been seeing a lot of lovely project bags. I've enjoyed my Firefly Totes very much (both big and small), and I've made small drawstring bags too. What I've seen that I haven't tried yet has been kind of angular, boxy bottom, zippered top project bags that look like they're kind of a standard type. I don't have a pattern for it myself so I went looking. I ended up using a YouTube tutorial from Voolenvine that was very clear to follow and looked like it was about the type I was seeing. 


I ended up not using the measurements given in the tutorial just because the scrap of this awesome mushroom fabric was a bit bigger. I kind of wish I had cut it down because the depth of the bag would be better suited to something wider, but I learned. No squares! Use rectangles :) Instead of fusible fleece, I used scrap batting I had on hand and just quilted the outer panels with straight lines spaced maybe 3/4" apart (followed an easy to see line on my sewing machine, no other reason for the spacing other than it seemed about right). No regrets there. It is sturdy and I think the vertical quilting helps it stand up as well. A fusible fleece may have been more robust, but I'm using what I've got and I've got a LOT of batting scraps.


I made the tab out of scraps of a cute snail print, a bit wider than called for - I cut a 4x3 piece (instead of 3x3) and made it 1" wide since my D ring was bigger. I ended up skipping the handle mostly because I didn't have a lobster claw finding to hand. I think I can hook a carabiner or something similar to the ring should I want something longer. Maybe a tassel! The inside is a heavy toile that is also in the canvas family. I've had it forever and it's nice to have another place to peek at it. It pairs quite well, if quirkily, with the mushrooms. 

I enjoyed making this, and it's going to be nice to use for something, whether travel or craft projects. If I make it again I'll fix the ratios. In the end, it's pretty darn close to the ones I have been seeing so that's awesome to know. I've seen a few other zipper installation configurations and it will be fun to understand those, too, if I can find a tutorial. I've been having a good time coming up with prints and zipper color combinations, so let the adventures continue.

Tuesday, April 7, 2026

bag lady reprise

Late in the evening of my "bag lady Saturday" I found myself wondering what would happen if I downsized the pattern I was using for the zippered project bags to make smaller ones. Voila! They are super cute.  I used a fun stripe print for the inside, and combined a pretty purple flower print with some sassy alpacas.


I was inspired by the piles of scraps leftover from the baby quilt I made recently, and I sort of improvised my way through the sizes based on whatever the scraps told me. I suppose I could measure and try to replicate this again, but of course I didn't write anything down so this could be like those dinners you sometimes make only once because there's some random combination of leftovers in the fridge. 


I made two, one for me and one for a friend. I think I'll keep the one with the little tab and give her the one with the purple zipper. 

Thursday, January 8, 2026

well that was quick

I cast on the project I saw this weekend on Monday evening and got a few inches done that first night. As predicted, it was quite a quick knit! The pattern is easy to memorize and as usual the striping makes it so easy to think "just one more row". The pattern is Washington Square, and I modified it to cast on fewer stitches and kept it one gauge instead of switching needles as I went for a more rectangle cowl vs the shaped one meant to go over shoulders. I also didn't reference how many rows to do - I decided I would just keep knitting until I rain out of my single skeins of yarn. (The sample at the shop said it was one skein each color, but when I looked at the pattern the "true" project turns out to require more.)
 

I actually had a pretty obsessive relationship with this one, though it was a bit limited by the fact that it was harder on my hands because of the chunkier yarn. Still, it didn't take very long for me to finish it up. I took it to Wednesday knit night - perfect project for chatting and catching up - and finished off the bind off when I got home. I'm not 100% pleased with the Icelandic bind off I chose, I think it's a little bit too loose and doesn't nip in the edge quite as nicely as the long tail cast on does. In the photo below you can tell which the bottom is just by the way it funnels out. I have half a mind to redo it, but I also kind of think no one will know but me? The jury is out. 


Other than that nagging detail I just love it. The color combination is stellar. The warm neutral, while difficult to coordinate with any other gray in my wardrobe, sets off the gorgeous variegated yarn so well. And apparently I was pretty smart when I got this skein of Lotus even though it sat around in my stash for so long. It is such a beautiful combination of some of my very favorite colors. I especially like the squares where the purple and blues combine, it's very reminiscent of clouds at dusk. I am very pleased with it (as you can tell from the "ta da it's finished" photo below) and have already worn it to work today! 


Thursday, June 25, 2020

Greenwood sweater, finished

My sweater is finished! Of course, not without a little bit of drama. I realized while putting the needles away that the one I used for the body was a 4 mm (US 6) rather than a US 4. The whole sweater. OMG. The gauge was correct anyway so I guess that’s what really matters. Actually I did use the correct size needles for the arms, and when I compared the body to the arm there wasn't too much difference but I could tell the fabric on the arms was slightly tighter, not surprisingly. I took a deep breath, complained to Dave, then let it go and blocked it to the measurements. And it came out pretty respectably. 


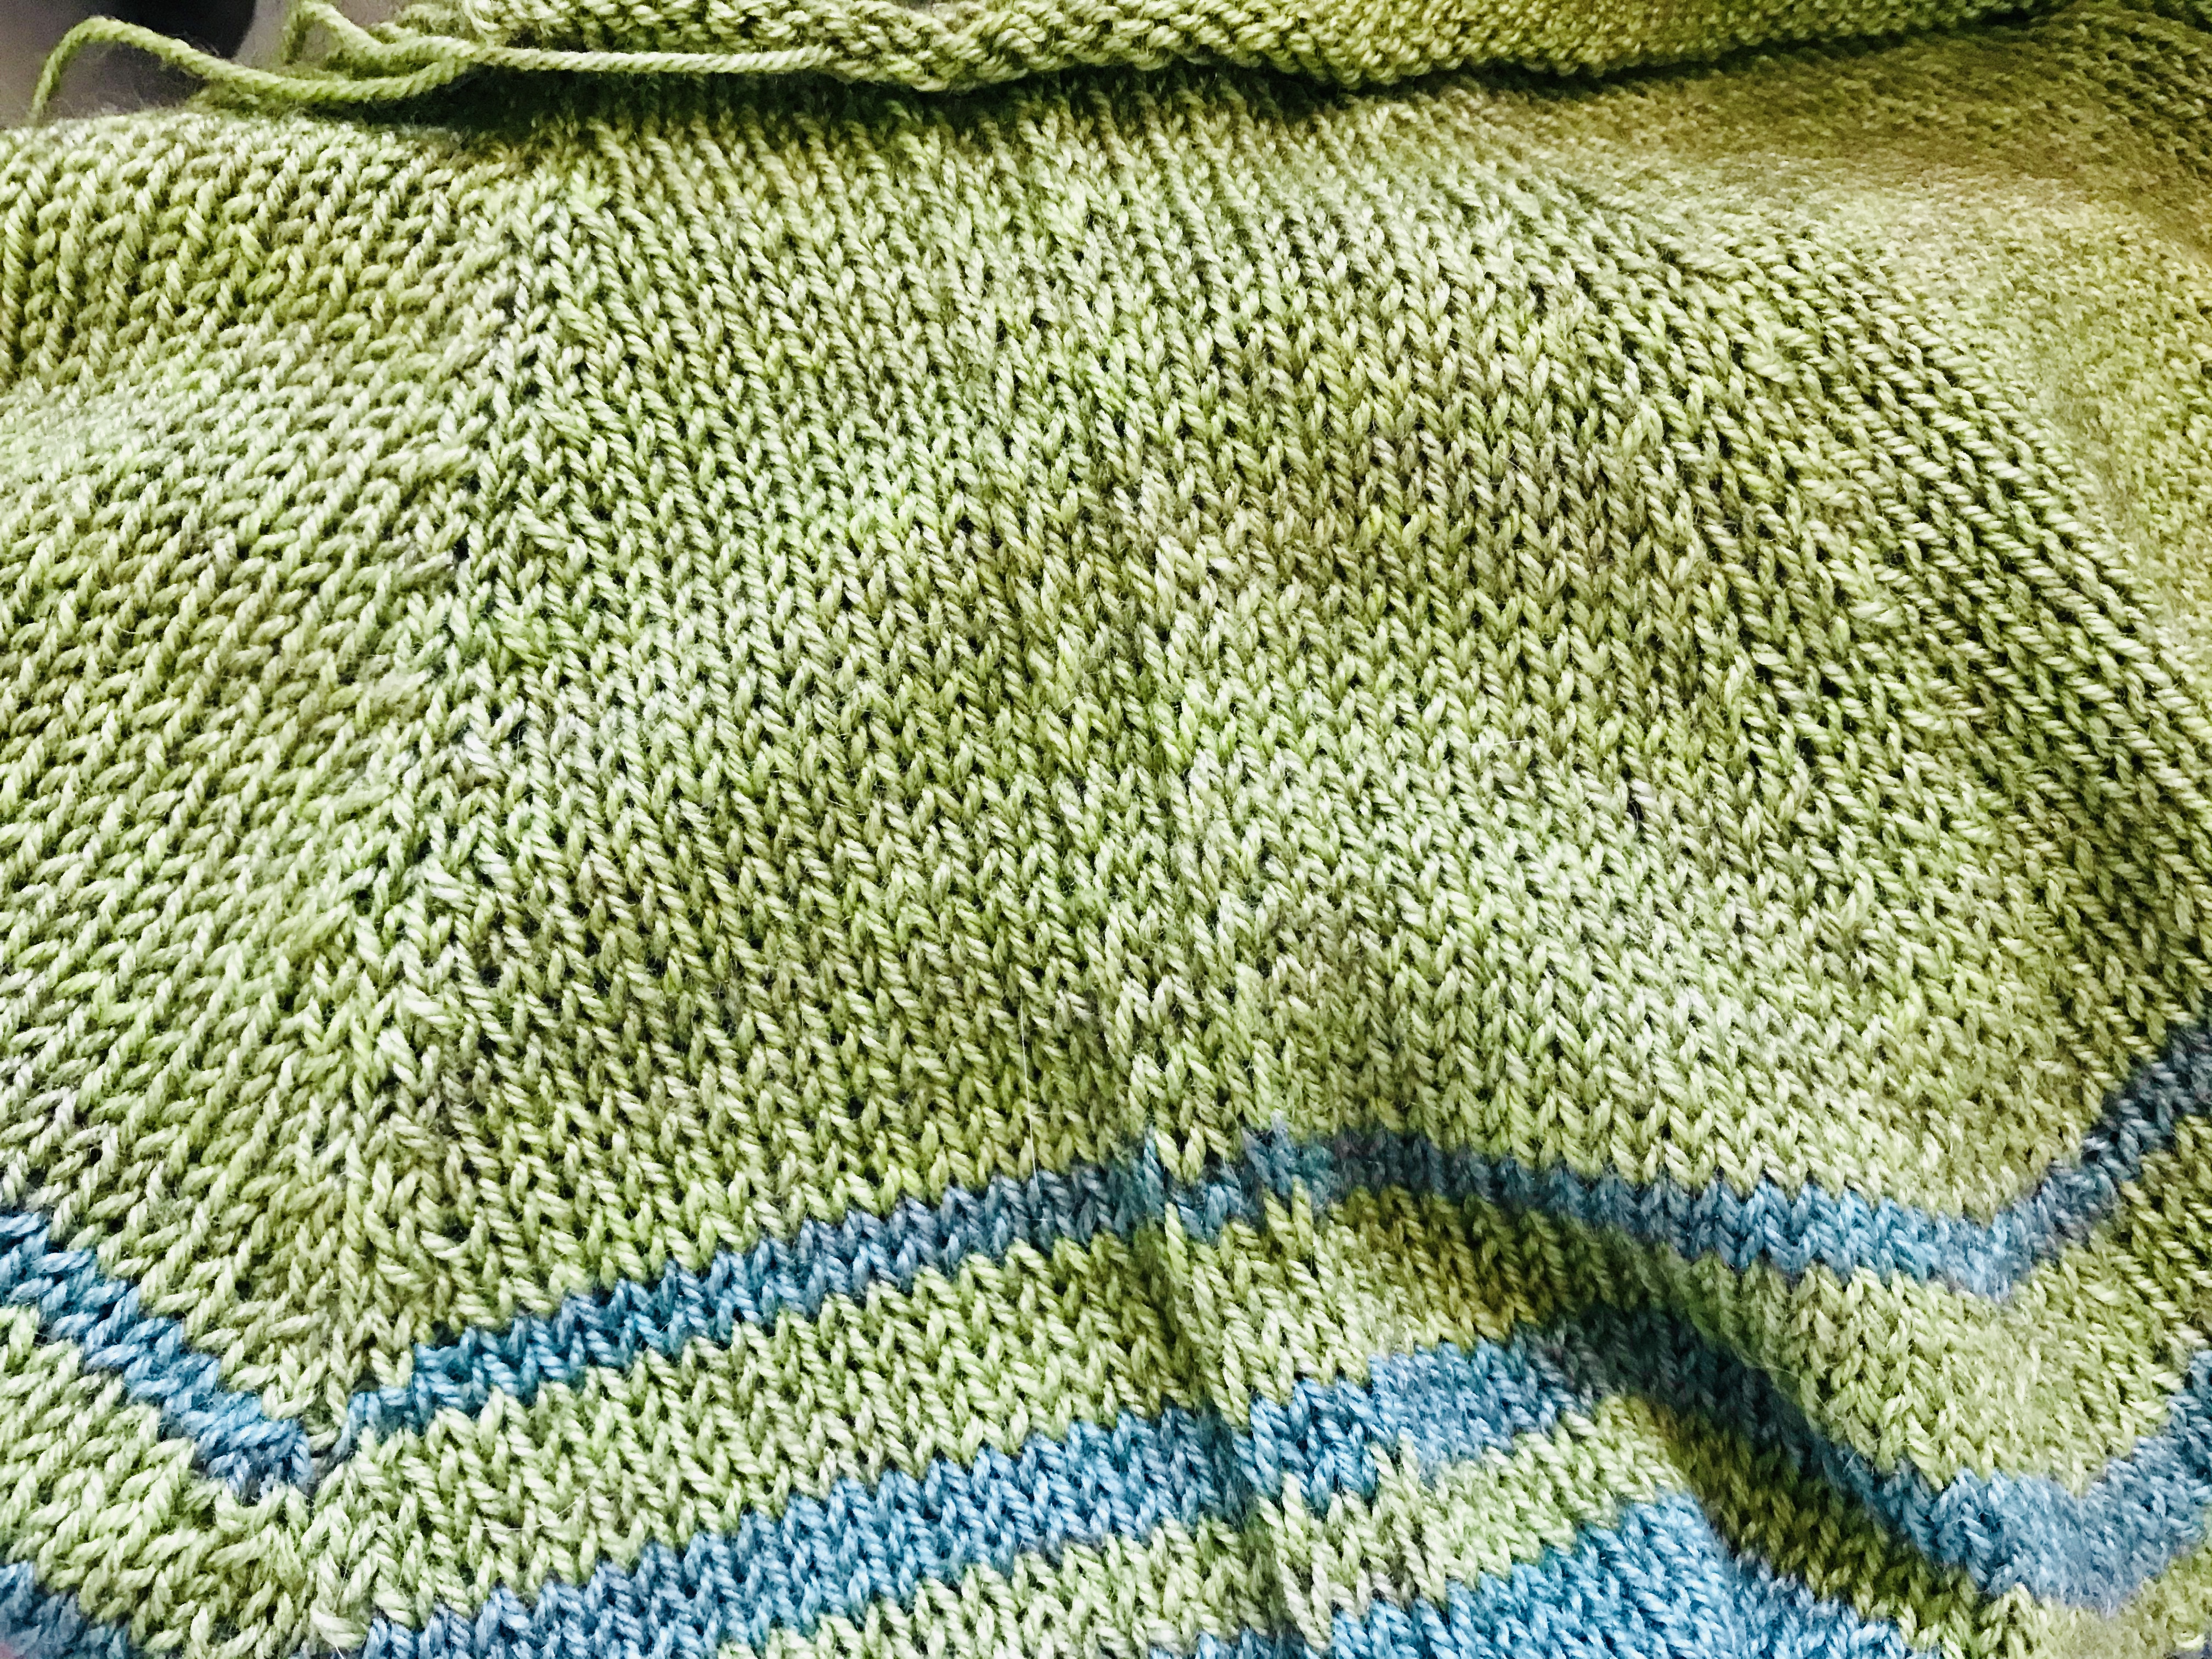
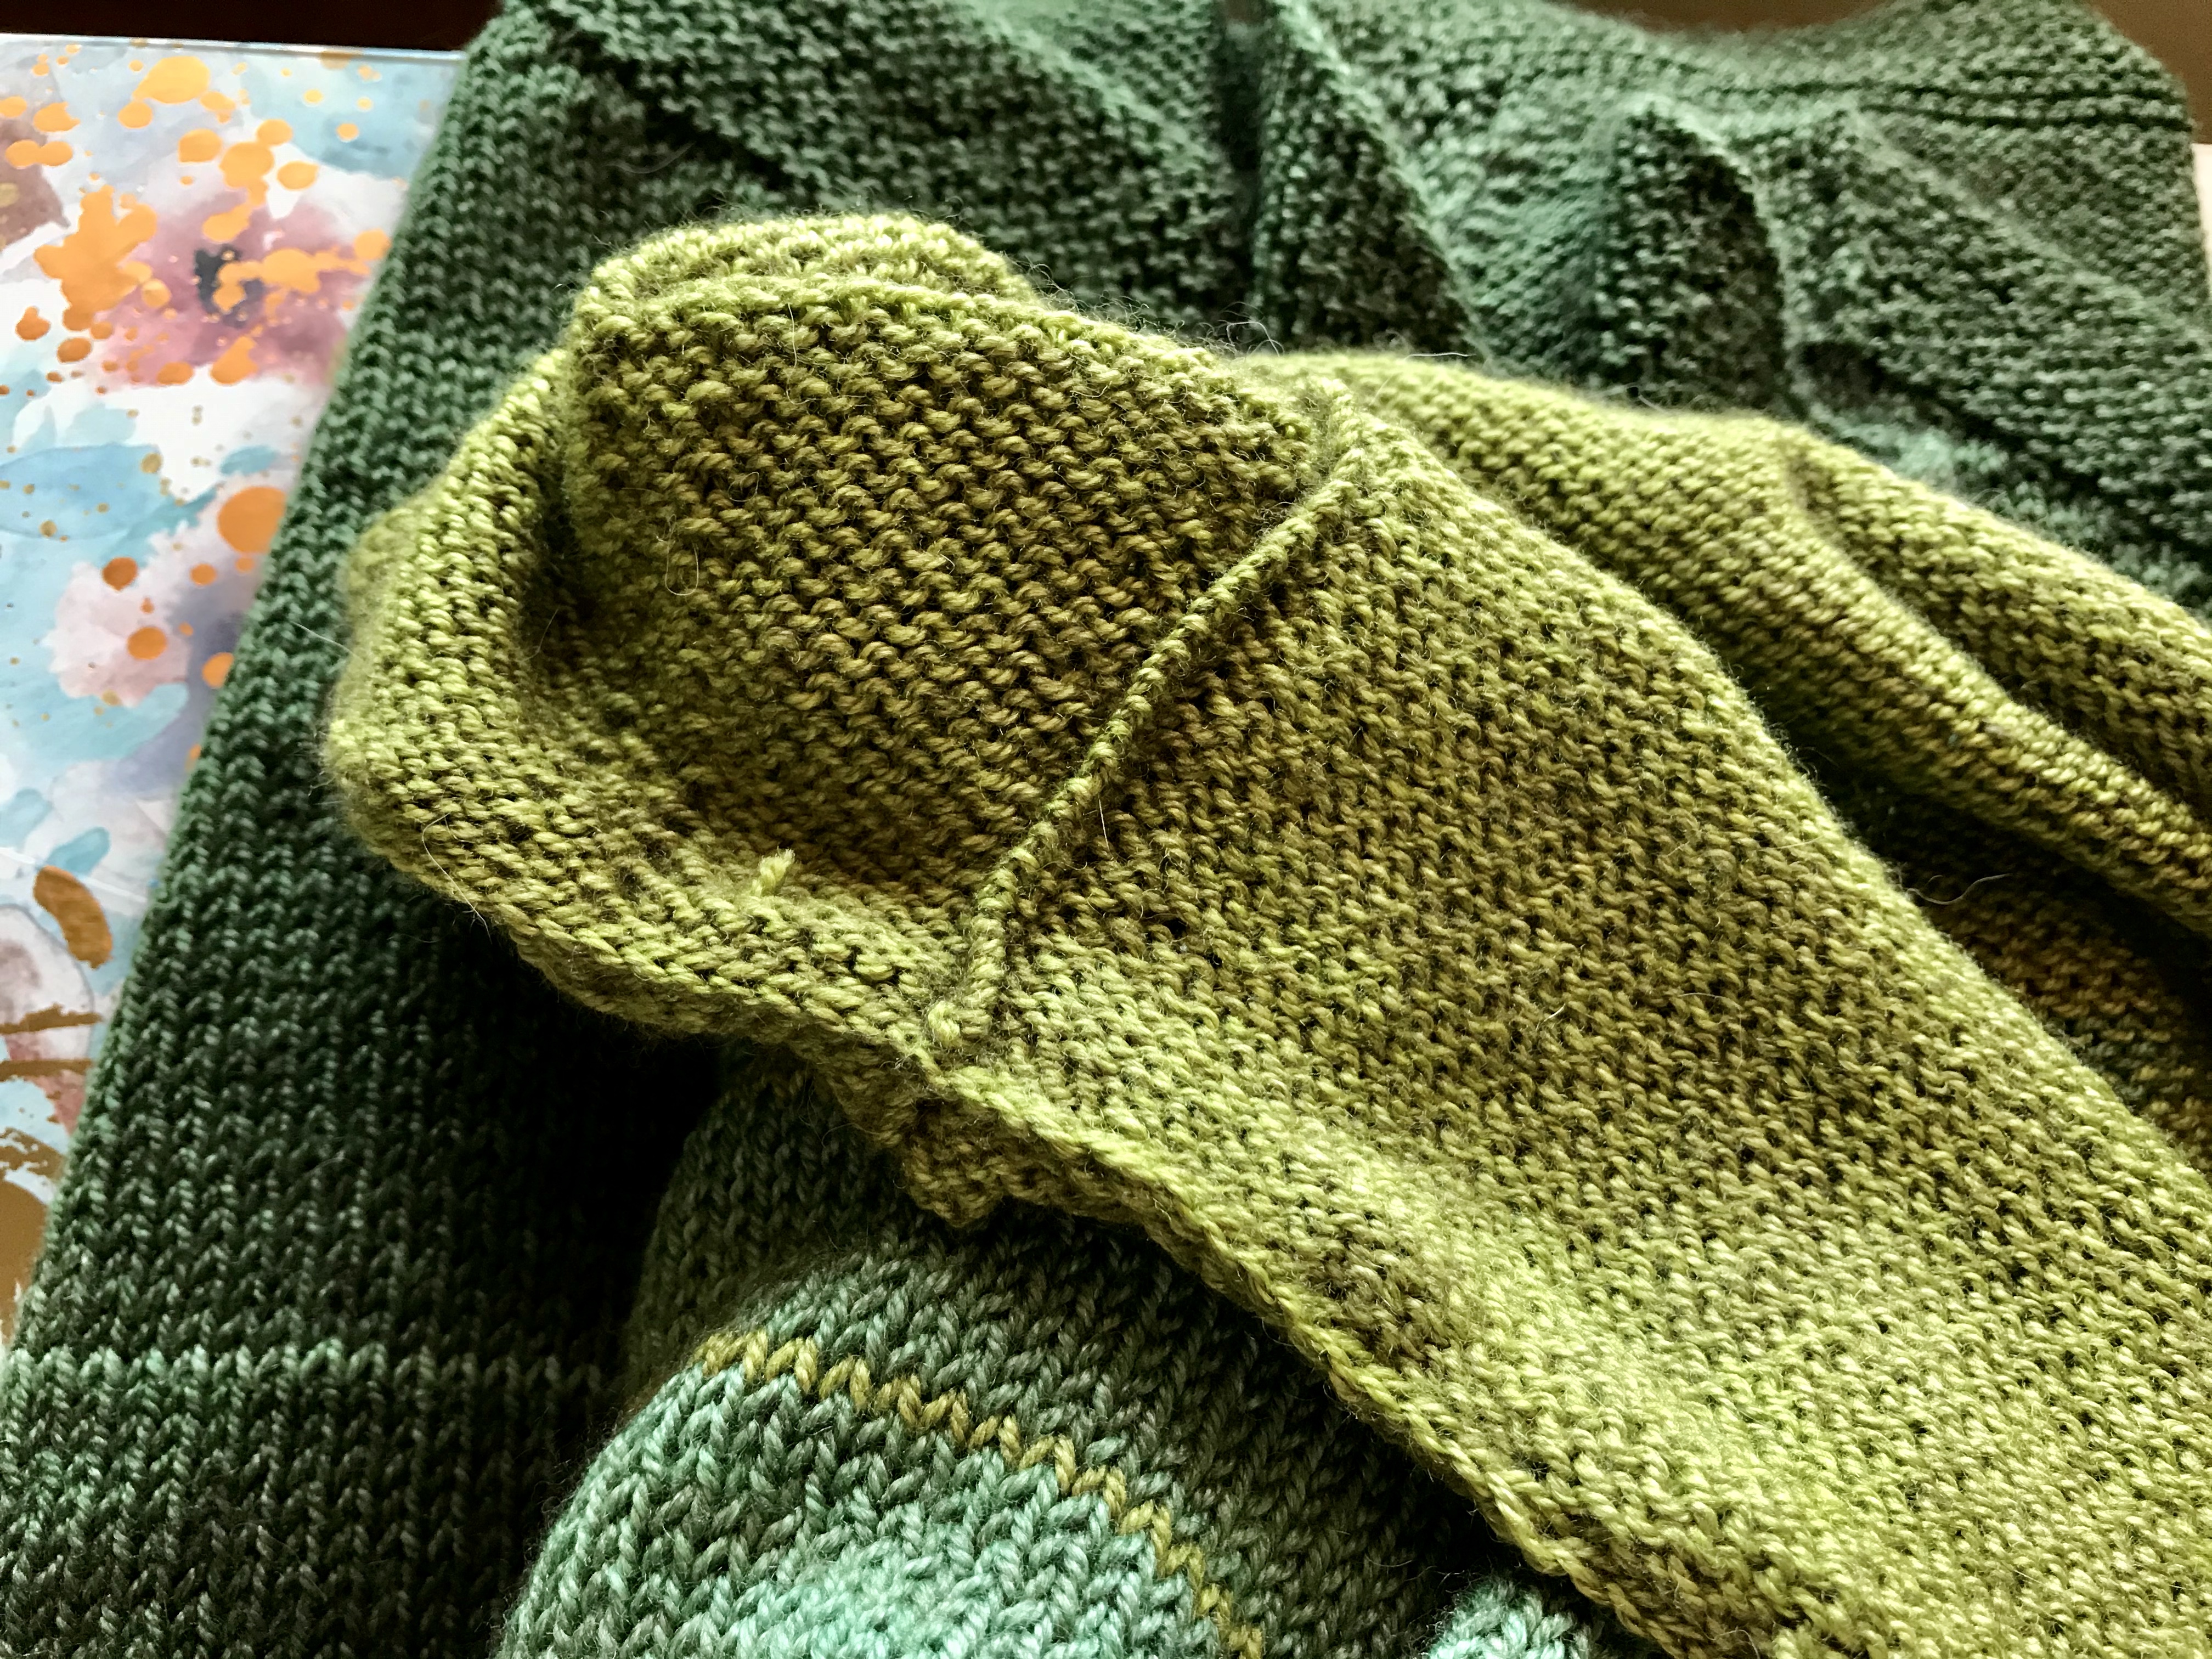
I messed with the fit the day after blocking and ended up being quite successful. What the issue really was, I’m sure in part because of my needle “oops”, was the armhole/neck area was a bit saggy. I took each raglan seam and did a mattress stitch up the two knit stitches between the decreases (got that trick from https://fringeassociation.com/2015/01/20/basted-knitting-or-seaming-a-seamless-sweater/). That gave a bit more structure to the shoulder area.


The photo above shows the inside of one of the shoulder seams where I've made the correction on the left raglan line and not yet on the right. The texture in the middle is the slip stitch faux side seam. Below is the same section of the sweater right side out. The left raglan is narrower by a stitch but doesn't look at all unusual. Importantly, it is significantly less stretchy along it's length so the shoulder doesn't sag down under the weight of the sleeve and body. 


For the neckline I did a crochet slip stitch all the way around starting at a shoulder seam (that idea came from https://biscotteyarns.com/blogs/knitting/how-to-tighten-a-loose-neckline-after-it-s-finished) I did just the back and two shoulders first as suggested in that post, but then went for the full circle after trying it on again. For me it keeps the neckline from stretching out and off my shoulders. It is still a pretty generous boatneck, 12.5” wide or so. Below is a shot of both the raglan seam correction and the crochet along the neckline. Because it isn't a seamed neckline I tried to do it a few stitches down from the bound off edge so the neck would still roll. It took quite a bit of fiddling and patience but was totally worth it for the extra help it gave the shape. Thank you to the adventurous ladies who came before and shared those solutions to what must be common problems!


I bought this yarn and pattern at Stitches West in February of 2019 from an independent dyer in the marketplace, Greenwood Fiberworks. She had a red/pink version of this sweater on display in her booth and I am proof that it helped her sell some of her lovely yarn! The yarn is a wool/yak/silk blend and was nice to work with and had a lovely drape in finished fabric. The silk gives it a little bit of extra fancy without being shiny. I remember spending quite a while in her booth considering all of the amazing colors before settling on these greens. I really liked the medium green in the center and kind of worked from there. I thought about playing up its aqua tones but ended up deciding a green sweater would suit me nicely. 


The original pattern is not written with stripes, but the dyer that I met made this modification and shared it. It didn't necessarily net her anymore skeins of yarn sold, but I think that was a clever way to appeal to those of us that like to make shawls with multiple colors. It's a gateway sweater of sorts. Indeed, this is just my second sweater I've ever made and I will admit to being intimidated but intrigued when I walked away with my bag full of yarn and the pattern in tow. 


I am super happy now that I fixed my problem areas. It’s a very forgiving shape on me and I love the hemline design. All those short rows are worth it! I remember when I started out the short row sections seemed like they would never end. It was easy enough, but I was definitely counting the inches until I could stop purling and get to exclusively knitting in the round. I am really proud of this sweater not just because it's another project off the needles, and a significantly large one at that, but also because of the adjustments I was able to make to the fit. I also think the color combination looks fabulous and I'm looking forward to some crisp autumn days so I can drink a cozy cup of tea on the patio in this. 


I know I will always think of this as my "quarantine sweater" because I started it a couple of days after the county officially issued a shelter in place order to prevent COVID-19 spread back in March. As I cast on I remember thinking it would be a good thing to occupy me while we were both full time at home and wondering if I would be able to finish it before it was over and we were back to being out and busy... we are not under a complete lockdown anymore, but there is still a long way to go. 

Pattern: Hold Sway Sweater (my Ravelry page)
Yarn: Greenwood Fiberworks Yakity Yak in 'lime', 'seafoam', and 'pine'
Needle: US 6, US 4, US 3, US 2.5

Monday, June 22, 2020

week fourteen

As masks have become required apparel in pretty much every situation when we leave our house, it was time to add to Dave and my respective wardrobes of one. We’ve multiplied up to four each now. If I’m honest it is pretty fun to pick out fun prints and color combinations and I’ve come to love my husband even more for having the humor and personality to wear them. I found some great flamingo and science fabric for me, and got some sushi and camping prints for Dave.


I’ve mainly been sticking to the tie back masks because I will get rubs behind my ears just from thinking about putting elastic back there. There have been times that it would have been really nice to not have to stop and tie up, though, so I made each of us one with elastic for those quick on/off situations. For those I used a pattern that was super simple to make from a couple rectangles of fabric. The pattern I’ve used most is one my mom shared with me and requires the extra step of tracing a template out and a few more seams to get the face-shaped mask. Both work just fine on us. 


For the tie backs, I’ve been using Wright’s double fold bias binding. They’re pretty inexpensive and come in lots of cool colors. The real bonus is that they are already ironed. I could (and probably will) definitely make my own ties from strips of fabric but the appeal of not having to iron those long skinny strips is so great. I did goof on the purple binding, though. Notice how it’s much skinnier? It’s important to make sure your package of bias binding says “extra wide” double fold. To be perfectly honest, the skinny one worked out just fine but I think it has more grip on my head if it’s the wider tape. 


My first ties were kind of ad hoc and pretty random based on the length of the strips I had in my stash already. There was pretty much no thought that went into it. After looking at several patterns and their approaches I’ve decided my go-to is this: use a 9-inch strip and tie into a loop with a square knot; hide the knot in the side channel on the mask; use an 18-inch strip on each side and attach to the loops by folding over a small tab and sewing it down so it loops freely over the first piece. The side loop provides some pull back both “up” and “down” on the sides so the mask doesn't bunch up weird and the fold-over tab attachment approach for the side ties means they can move up and down as they need to in order to fit best with whatever hat/ponytail etc. it has to get around to tie securely. It also means you use 1.5 yards of the binding for each mask which gives you 2 masks from each 3 yard package. 


This set here with the double ties is for a friend’s daughter. She wasn’t feeling very positive about wearing a mask as she gets to go out into the world a bit more in the coming weeks, but said if she could have one that was basically the same as the ones her nanny wears then she’d try it. Ta da! They took more binding, more like 2 yards each, but turned out super and were quick to make as well. These ties are sewn directly into the seams of the mask. I’ve also seen versions where the binding is sewn directly across the top and bottom of the mask to enclose that seam, too. I’m hoping these will make wearing a mask a little more approachable, and I love that I can share my girl science fabric with her. 


Dave and I make quite the pair when we are out and about with our bright fabric faces, but why not try to make this as bearable as possible? The way I see it, at least we can each get a chuckle together as we don our masks and step out of the car or peek around the grocery aisle to recognize the sushi face at the other end. 

Friday, June 12, 2020

a quilty stand-in

In case I've been giving the illusion that I'm organized, this is basically what my planning process looks like. Actually, it was much more chaotic before I curated down to the fabrics I would actually USE in the quilt. There were fabric squares and yardage all over the place and much hemming and hawing over whether or not I'd chosen a good pattern. Forget the card table, the floor is where it's at. 


And here is the fabric that started it all. While we were out last weekend exploring our newly reopened Joann's in search of quilt backing for the two tops I've got completed, I came across this amazingly cute minion print. My brother is a minion fan - like his car is yellow and named Kevin. He's turning 40 this year and I am incredibly bummed that I won't be traveling home to celebrate in person. I'd been turning over the idea of sending a quilt stand-in instead and seeing this made me decide it was definitely a good idea. These little dudes are going to be the backing fabric. 


I found a neat inspiration pattern online that was very geometric and looked like it was really well suited to solids. I did think about buying all new fabric but challenged myself to search my stash first. It wasn't at all straightforward to find masculine fabrics in my menagerie of flowers and cutesy prints, but I am quite happy with what I came up with. He likes orange so there needed to be some of that, and definitely yellow to minion up the front, then I just sort of played around with options until I decided that the blue ikat print from Amy Butler's Lark collection would be fussy with regards to orientation of the HST blocks but totally worth it to tie everything together. It's got primary colors in it that will make this bright and fun, like Kevin the minion. 


I didn't want to do a white background and that was all I had a lot of in my stash, so back to Joann's to search out a good gray. I bought them out of medium gray Kona (only 4 yards, don't judge) with the expectation that I will find other good uses for the extra yards. I do have a big quilt in the works and another one already planned and on the shelf, but these fabrics were calling to me. It was the work of less than an hour to get them all cut into squares and ready to go. I am feeling so inspired by the bright colors and the geometric design, I can't wait to get started! 

Wednesday, April 15, 2020

forest fog, finished

Ta da! My second largest project to date folds up nicely into a cute little pile. Amazing to think it took me so long to complete it. Ha!


It does in fact roll out to quite a nice sized blanket. This is based on a pattern, but with a twist. I totally read the pattern incorrectly when I started and began with a field of flowers instead of the trees. There are supposed to be three panels of trees and two panels of flowers. Instead I found myself well into the first set of flowers before realizing my mistake. What I did to avoid ripping everything out was split the second panel of flowers in half so each pairs with the top and bottom tree panels and made sure that the dividing row patterns were modified enough that I still had the same number of rows in the blanket overall. I've worked a pattern by this designer before and don't recall having any problems, but it was a much differently constructed piece of crochet flowers, so I'm sure it was written quite differently, too.


Regardless, I like the way it looks with that modification. Each set of trees is sitting in a field this way! Yet another example of how an oops can turn into a nice design feature. After a good soak in the bath tub it was quite heavy but rolling it up in a big beach towel and walking on it fixed that. I wire blocked the center panel to 54x64, making the total dimensions approximately 60x70 including the border. It basically coopted the entire floor of my studio and nearly all of my blocking boards for a good several days while it dried.


Instead of pinning all the leaves I just stretched them out to lay flat and let them dry as they will. They turned out fine. I finished up weaving in the ends from the border on Monday. Many knitters decided to skip the border altogether and I was tempted. It seemed like a pain to sew a border on such a large edge, but I am very glad I did. It gives the piece a little more whimsy than straight edges would. Like it takes itself less seriously. 


I'm enjoying the pop of purples on the back from where I crocheted on the border. It's not very noticeable on the front but goes nicely with the gray anyway. I do love the particular shade of this gray. It's cool like the coastal fog in the redwoods. The coast and the fog is further away today than when I started, but the cool coastal winds still come over the mountain behind our house to say hello. Those winds definitely necessitate a cozy blanket to wrap up in, waiting patiently on the quilt ladder in the corner.


Pattern: Tree of Life Afghan by Nicky Epstein (my Ravelry page)
Yarn: Lion Brand Wool-Ease Solids, Heathers, & Twists in 'gray heather'
Needle: US 8
Size: approx 5' x 6'

Wednesday, April 8, 2020

time for a sweater

I'm super proud of myself for finishing all of my knitting WIPs this year, even some of the longstanding ones like my great big gray blanket. I've snuck in some fun small projects in the past few weeks, too, but I've also got a great start on my next big project - a sweater! It was honestly next in line in my arbitrary list of crafty things to do, but also what better thing to do during a statewide stay at home period than see how far you can get on a sweater? Well, so many better things, but what better knitting thing. Let's keep some perspective here. 


I cast on not long after our county issued the first shelter in place order in mid March, and I've got a good start on the hem short row shaping. I did have to cast on multiple times which made me extremely unhappy, especially the time I KNEW I checked for twisting before I joined and ended up stitching a mobius strip anyway. Argh. I'm enjoying how soft this yarn is in my hands, Henry and Rum are hanging out on my cable keeping me oriented, and I'm having fun doing something that is just simple stockinette in between all the color work that's been going on. 


It's slow going for now because the hem shaping isn't in the round and purling always slows me down. But here's where I remind myself that it isn't a race and that I'm supposed to enjoy the process. Here's to my quarantine sweater!

Friday, January 10, 2020

furry lining

This knitted cowl has been in my cabinet since 2011, I think I've worn it maybe once. It's made of a very squishy and weighty alpaca yarn in a gorgeous purple color that I just love. Problem is, it's super itchy. I don't know if it's an allergy or just sensitivity, but it has been uncomfortable enough that it's prevented me from ever reaching for this when I need a warm neck. What's a girl to do?? Obviously the answer was to line it with fur. 


I noticed that I've been consistently admiring lined cowls this year as I'm out and about. They're showing all sorts of fluffy fillings to cowls including faux fur. While I was out at the fabric store for other things I stopped by the remnant section and found a good chunk of this gorgeous brindled fur. I used some of it for a stocking Mom and I made for Jasmine, but we had plenty left over for me to try this out. 

The first strip I cut was an inch or so short. It fit the piece fine, but wasn't able to get around my head twice like I wanted for this longer cowl. I fixed that for the second piece (and now have a tube of fur to find another use for...) and sewed it in by hand with a simple whip stitch. I thought about machine sewing but the more I considered how difficult the fur was to sew for the stocking, the more I second guessed that and stuck with doing it manually. It turned out great and it's also super warm! Betting it gets a lot more wear now with this little addition. 


Sunday, May 26, 2019

a unicorn birthday hoop

Yesterday I took a trip over to Michael's to get some aida cloth for an idea that popped into my head. I've really been enjoying cross stitching lately, and I've been spending way too much time on Pinterest looking at witty sayings in embroidery hoops. Combine those facts with a friend's birthday this weekend and you have this quick little project. 

DMC has a lot of free embroidery and cross stitch patterns on their website. I've spent the spring downloading flower and succulent patterns, which made me wonder if they wouldn't have a unicorn simple enough to make in a couple of days. 


Ta da! I didn't follow the colors in the pattern, though I'm pretty close. I have a pretty large thread stash that doesn't need to get bigger right now, and many of these colors fell under the "close enough" category. I also modified the horn, which was supposed to be a rainbow, to be a swirl of yellow and peach, which I like better. The original pattern also has some starbursts and hearts in the background but all I really wanted was the unicorn head. So there we have it. 


I finished the last stitching and final touches this morning and it is so very cute. I would totally keep it for myself, but it's perfect for the birthday girl. The hoop is a bright yellow plastic one I also got at Michael's. I finished off the back by tidying up the aida cloth with a trim and cinching it closed with a running stitch using white thread. I considered but ultimately abandoned a felt backing because this particular hoop design makes it difficult to stitch on and I did not want to use hot glue on the plastic. 


I envision peppering my walls with little hooped vignettes now... it's probably a good thing that I have a lot of other projects going or else that might actually happen! Hopefully at least a few more will make their way out of my imagination and into real form because this was a really fun and really quick project. 

Now back to the last rows on that mosaic baby blanket.... 

Wednesday, May 15, 2019

a vacation project

At the end of April we headed east to Kentucky for a week and a half. I was pretty far along on my mosaic baby blanket and it was too big to really take on the plane and be comfortable. Soooo as has become vacation tradition, I started a new project the night before we left! Pack, start new knitting project. Makes sense, right?


I made a lot of progress on the plane and then had many relaxing moments during our stay in Kentucky to get all but the last lace panel done. I finished up a couple of days ago, about a week after we got back so that makes two and a half weeks from cast on to bind off. Whaaaat. That amazed me. I was always wondering how some of the folks on Ravelry could finish big projects in like two weeks. Now I know.... lots of time to sit and knit. 

I love the stripes but you know what that means.... ends! So many ends to weave in. Were I a more motivated human being I would have that done and this blocked already, but I want to work some more on that mosaic blanket before I tackle this mess. 


Kepler made very important contributions to the last sections of this project by keeping my yarn warm as I worked in the evenings after we returned home. I wonder if I can get him to help me weave in all those ends??? 

Wednesday, February 6, 2019

mosaic musings

I'm not sure why the colors are so difficult to photograph, but my mosaic crochet project is nearly complete. I basically went until I didn't have any of the Caron cake left, which unsurprisingly did not get me through the whole pattern. The original pattern has a border motif, so when I got to the end I just had to figure out how to gracefully finish up the pattern so it looked ok at the edge. I ended up using a little bit of some stash yarns to get the last rounds finished, a peach for the pattern rows and a dark brown for the background. It's noticeable if you're looking for it but overall not a bad solution.


It's too big to be a pillow cover and not big enough to call a blanket at just about 35" square unblocked, but Dave made the point to me that it is actually a nice size for a small lap throw so I'm going with that. The plan is to make some pom poms to accessorize it. I got this pretty gold yarn for that, and I'm just trying to decide on what my pom pom strategy is going to be. Four corners? Two edges? Hilariously huge? Just big enough? Not sure yet, but I think once I make a few and audition some options it will become clear.

Friday, December 21, 2018

more barn gifts

And what to my wondering eyes should appear... more Christmas balls! And these are horse themed for barn friends. After getting gifts for my family squared away, I had a few days before leaving on our trip to Kentucky tomorrow to get some fun ornaments done for horse people. 

This one is for someone who really likes unicorns. I searched around online and pretty easily found a chart for a knitted unicorn head and made just a couple of modifications, moving a stitch here or there in order to make it work for the size space I had to work with. Not bad!


This second one is for a woman I recently got to know who has also just gotten herself a new horse! Lucky lady. He is black and sweet and lovely, so I thought this rocking horse would be appropriate in black and white. The pattern is another out of the 55 Christmas Balls to Knit book which says the rocking horse is a symbol of good luck and prosperity - something I certainly wish for the two of them!


This last one is another case where I found a chart online and adapted it for the ball pattern. This guy had columns taken out in the belly region to shorten his body and I changed his head a little bit too. I am actually really pleased with the black on red look. It's actually quite elegant looking and the contrast is really strong, something I wondered about. 


I'm super happy with how these turned out, and everyone really enjoyed receiving them. I think they are really great gifts, and now I know they can be hyper-personalized if needed! It was so easy. I suspect some more of these horse themed baubles may be coming along in the new year... 

Monday, October 29, 2018

tangerine

Yep, more leftovers. These are lovely alpaca blend yarns leftover from a scarf gift a couple Christmases ago. I thought a logical follow up to all the mittens I've been knitting lately would be hats. Of course this doesn't match any of the mittens I've made but that isn't the point, is it? This project was a fun way to spend a Sunday afternoon. 


I really wanted to make a hat with a contrast double brim. I'm not sure where I got this idea but it got in my head and wouldn't go anywhere even when it got hard to find a pattern. I blame Pinterest, probably fair. I did eventually find a pattern ("A Very PDX Hat") on Ravelry. Truth be told, working the first rows in the round off of the provisional cast on was a royal pain in the rear but the brim turned out looking so great that I'll just have to suffer through again on another hat. It's just too cool. Maybe it was that my circulars were a little too long, hard to say. Or maybe it really is just a pain in the butt. Either way, the result was worth it. 


I thought I would settle in to make the whole thing in the barley color with the peachy inner brim and that would be it. Then I thought maybe I'd just do the whole thing in stockinette instead of the PDX ribbed pattern to keep it simple, and I'd put a navy pompom on top. But then I've been on a stranded knitting kick lately, haven't I? And there is that very pretty dark orange begging to be used. So here we have the mashup of two patterns, one for the band pattern and the other to tell me how to shape the hat. I was trying to make a fitted beanie for myself so I was conservative on how long to go before the crown decreases. Silly me, I tried it on and it fit just ok instead of great so I ended up ripping back and adding another inch. Then of course, it was a little more slouchy than I wanted. Never happy!

'

The real irony is that Dave came home at that point and commented how nice it looked, so I let him try it on. It fit perfectly. Guess who is getting another hat? And there goes the navy pompom idea down the drain. Really it tickles me that he likes it so much, so it's no problem at all. I was tempted to cast on for another, but matching hats might be a little bit much, even for us. Maybe I'll just borrow it once in a while!


Pattern: A Very PDX Hat (shaping and brim) and Magnus' Hat (band pattern) - my Ravelry page
Needles: US 7 and US 8
Yarn: Berocco Ultra Alpaca in 'Grove Mix', 'Persimmon', and 'Barley'

Friday, September 28, 2018

warm ears

I had 30-something yards or so leftover from each of the yarns my nieces picked out for their mittens, so I decided to make a matching headband for each of them. 


It took some time to find patterns that matched the weight and yardage I had, but in the end I like the two I found. Each only took a few hours to make and they turned out super cute!


This one is a pretty geometric lace pattern that I thought matched the triangle motif in Samara's dragon themed mittens quite well. I needed a little more yarn than I had so I used a bit of the turquoise from Jasmine's pick. I do like the pop of color at the back!


For Jasmine, I chose a simple cabled band to go along with her mittens which are pretty much cables all over the place. The bulky yarn makes for satisfyingly squishy cables and the stitch definition is awesome. 


For each of these patterns I did this weird made up thing to connect the two ends together. I turned the band inside out, picked up stitches through the cast on row while simultaneously k2tog with the active row which left me with one active row of stitches off of the closed band. Then I just did a traditional bind off of those stitches. This gave me a nice seam on the outside, a sturdy join, and a clean and neat edge for the seam on the inside. I'm sure someone somewhere has done that before, but I was pretty pleased with myself for coming up with it. 

Time to pair these up with their mitten mates and send them off!