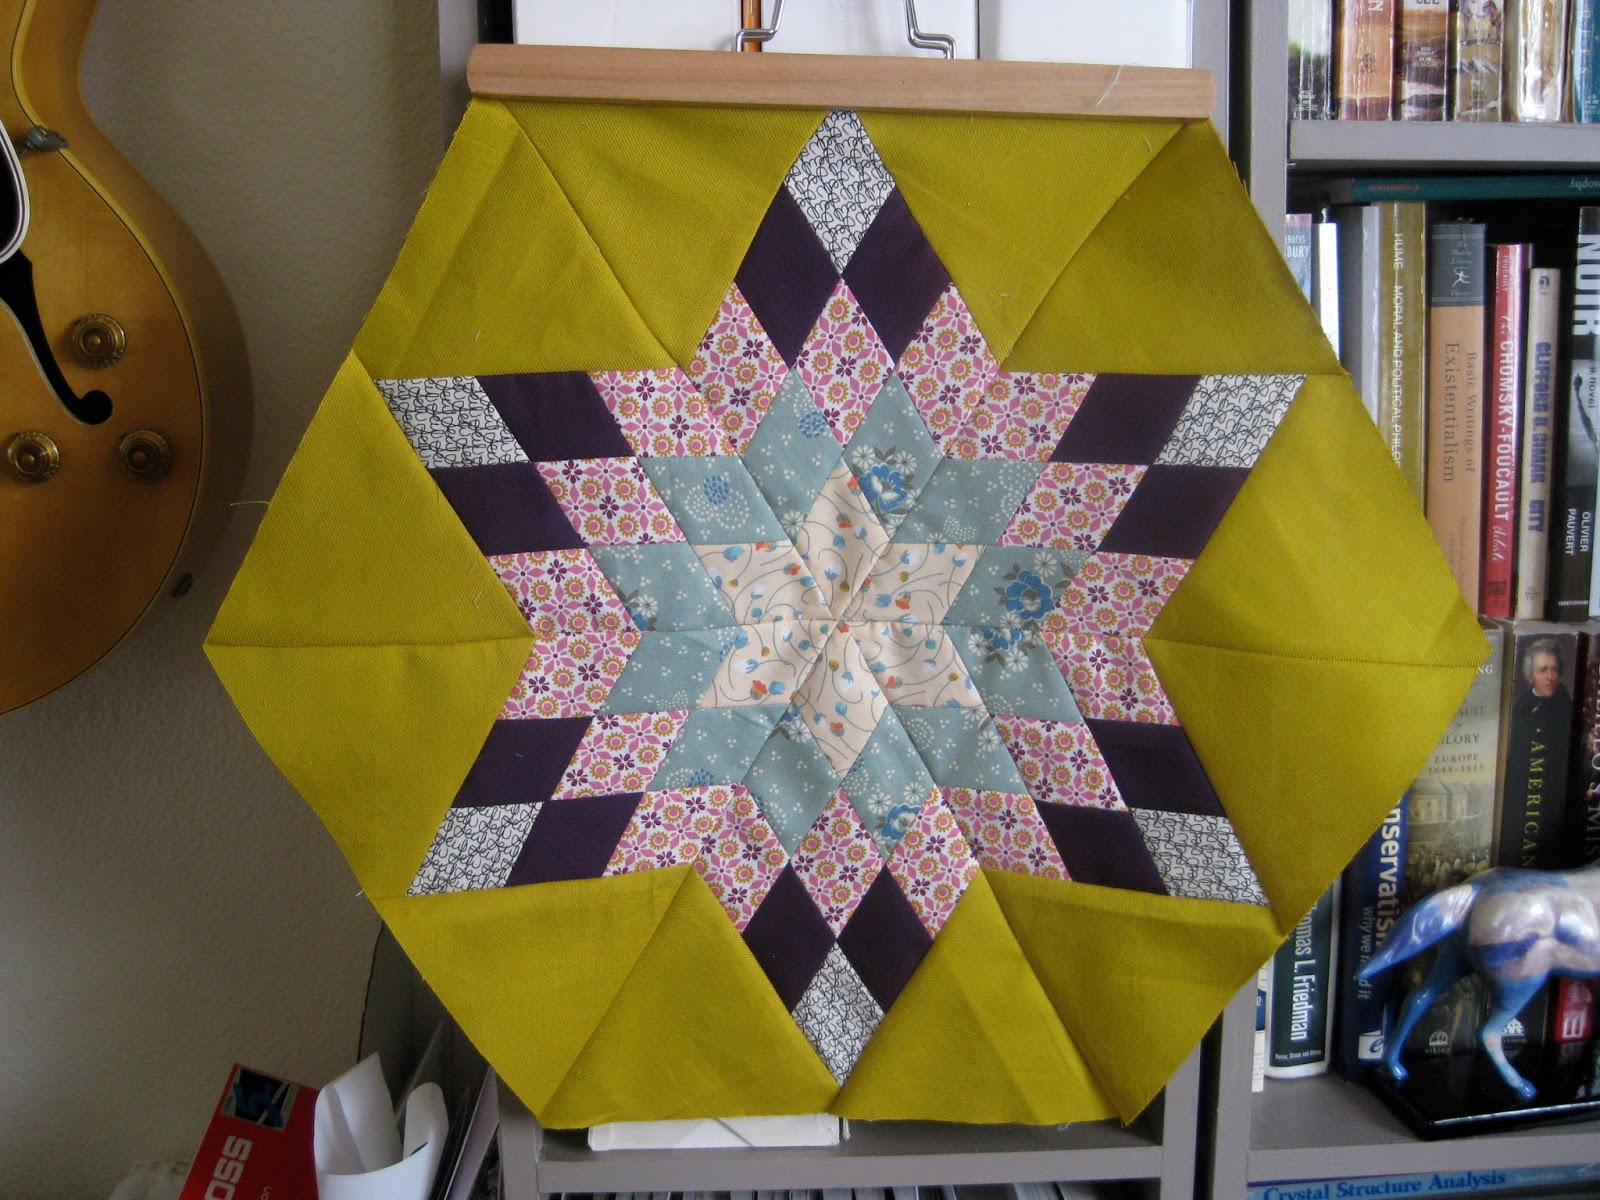
This September I am one of two 'queen bees' in the Bee Sew Modern bunch. I've put together a tutorial for the block I am requesting everyone take a shot at. So first off, thank you guys! I hope you enjoy making this block; I certainly had fun with my test block. It looks like a lot of steps, but it isn't really. I just included a lot of pictures and explanation for clarity's sake.
I'm calling it a Lone Star Hexagon, and it is inspired by a
photo I 'favorited' on Flickr this summer. The project shown at the link is scrappier than the ones we'll be making. I thought I'd make it easier on ourselves by taking advantage of strip piecing instead of cutting and sewing all the diamonds together individually. This technique, and the resulting ordered arrangement of prints, is often used in making traditional Lone Star blocks (which are usually 8 pointed stars, not 6) hence the borrowed name.
A note: I have never sewn with diamonds or equilateral triangles before sitting down to figure this block out, and I survived. The key is to be gentle. No pulling! (Hard for me, I tend to tug while lining up edges.) My points aren't 100% perfect in every way, nor did my hexagon turn out perfectly when I assembled the whole thing. These measurements leave plenty of room for trimming the background.
All seams are 1/4", please press them open (I'm usually a to-the-side presser, but it makes things nicer here if they're open.)
Part 1: Fabric
Pick one fabric for the background (solid or simple print with no more than two colors, e.g. black and white).
Pick out 5 prints for the star (a solid or two is ok, but please use at least 3 prints). You'll need 2" strips at least 18" long.
I would like the colors to fall into the general scheme below. There are lots of colors to choose from; any combination of them is ok with me. Please avoid red in any of your fabrics.
Part 2: Diamond Nine Patches
After you read this, if you would like more information check out this lone star tutorial for 45 degree diamond patches, which I used as a rough guide for piecing my 60 degree diamonds and writing this section.
From the 5 prints, decide the order you would like them to be in the final star. For reference, #1 will be the center, #3 will have the most diamonds in the final block, and #5 will be the outer tips.
Cut 2" x 18" strips (can be longer, but I wouldn't go shorter than 18"):
1 each from fabrics #1, #5
2 each from fabrics #2, #4
3 strips from fabric #3
Sew your strips together lengthwise in sets of 3 as follows:
set A - #1/#2/#3 set B - #2/#3/#4 set C - #3/#4/#5
Cut off one edge to make a 60 degree angle and use this edge to create 2" wide blocks of pieced diamonds. The extra length (an inch or so) allows you to trim slightly if you need to to maintain the 60 degree angle with each cut. Sometimes sewing the strips together can lead to distortion of the perfect lines. Accurate angles are important, so check each time before you cut.
Cut 6 of these from each strip set.
Each diamond nine patch will be made from 3 blocks, one from each set. Before sewing these together, I used a little trick to help me line everything up for accurate points. Take two sets (B and either A or C) and trim off a scant 1/4" triangle from one end. (Note: do not trim the diamonds made from fabrics #1 or #5, you'll want those points for alignment later)
Feel free to use your own method of obtaining accurate points while piecing diamonds. This was just something that helped me a lot.
Make sure to line up the 60 degree line with one long edge of the diamond strip before cutting. In other words, you're cutting off a little equilateral triangle, not a right triangle.
Now placing two diamond strips right sides together, you just have to line up this little blunt edge to match the angle of the first diamond on the strip, sew with an accurate 1/4" seam, and your points should be aligned correctly when you open everything up and press.
The seams will look offset by about 1/4" at the edge you will sew. (These are just example strips I photographed, don't pay attention to the order of colors here.)
Do not line up the seams along the edge as shown below, your points will be misaligned.
Make 6 nine patches this way.
The hard part is done! Now comes the fun part --- decide which way you want your star to go. I originally started out intending to make my block with the script print in the center and the peach on the outer tips.
Then just to check I flipped the diamond patches around and ended up with this arrangement, which I liked much better. The moral? You can always change your mind. No big deal.
Part 3: Background triangles
Cut 12 equilateral triangles that are 6" tall (from point to middle of one side) from your background fabric.
How I did it:
Cut 6" wide strips from the background fabric. I chose 6" because it is close to the completed size of the diamond blocks and the width of my rotary cutting ruler. Cut a 60 degree angle at one end and use this edge as a guide to cut 6" wide diamonds the same way as the 2" strips of diamonds above. Cut the diamond in half along the short axis and you end up with 2 equilateral triangles.
Each diamond nine patch gets two of these triangles sewn to it along the outer edges (i.e. the edges that have fabrics #3, 4, and 5).
Cut a scant 1/4" piece off of one point of each triangle in the same manner as described above. Again using the same idea, line up the blunted point of the triangle with the diamond of fabric #3 and sew the seam starting from fabric #3 working your way to the outer edge of the block (this helps with stretching).
Your resulting piece should be a bigger equilateral triangle. Don't worry if the outer edges of the background are a little wonky. We'll trim.
Part 4: Assembling the hexagon
Sew three of your large triangle units together starting from the center and stitching towards the outside. This time DO match up the seams of the nine patches along the edges to ensure your points behave.
Sew the other three units together the same way. You now have two halves of a hexagon. Match up the long seam, again ensuring your nine patch seams match up along the whole length, and stitch together.
I found that making two passes starting from the center and stitching out in either direction gave me good alignment of everything along the whole seam. I recommend this rather than starting at one edge and going all the way across.
Part 5: Trimming
Trim around the hexagon edges leaving a 1/2" allowance from the outer point of the star to the middle of the hexagon side. The best way to do this is to line up your ruler with the four points of the diamond at the tip of the star and find a half inch that way. In the picture below of an already-trimmed side, you can see the half inch from the tip to 18" mark on my ruler and the cross that is aligned with the black and white diamond. Alternatively, if you would rather leave this step for me, I'm happy to trim.
If you trim, the hexagon will end up being 10.5" on each side.
It looks intimidating, but because of the strip piecing and cutting I found that it's actually not as complicated as it looks. My favorite part of all of your blocks was learning new skills and new designs, I hope you pick up a thing or two with this one - I sure did. Have fun with it! If anything is unclear, please feel free to message me on Flickr, send me an email, etc.


