Friday, December 20, 2019

travel pouch

I needed a quick gift for one of the barn folks I work with, and the advantage of having a rather robust stash and some sewing skills is that I could make one in an evening! I've have been wanting to make some zippered pouches lately, probably because I got going on those drawstring bags which were so satisfying to make. A little bit of scrap diving came up with the lovely patchwork below.


I had a lot of approximately 2 inch strips of Indie fabric that I sewed into strip sets. To make the patchwork I just cut the strip sets into strips 90 degrees from the stripe to give me tubes of squares. I ripped the seams of the tubes in different places to give me strips of squares that I could just sew together with a few seams to give me the patchwork. I like the ikat print across the bottom to ground it a bit, and I used the same print as the bag lining. 

For the back I kept the strips intact instead of making the patchwork - I like the difference a lot and it is a nice way to see more of the print intact. Each of the outer pieces were sewn onto scraps of quilt batting with straight lines 1/4" away from the seams using a contrasting thread, navy I think. 


Assembling it was a little bit of a pain mostly because I don't think I left myself enough room to maneuver around the ends of the zipper. I definitely broke a needle sewing over a piece I thought I had cleared! Oops. At least it was an old needle. The zipper is a light blue one I had hanging around and while it doesn't match any of the colors in the prints I like the way it works with them.

All in all this was a fun quick gift to make and I hope the person getting it uses it in her travels to shows and clinics.

Monday, December 16, 2019

sustainable fisheries

While out shopping on Small Business Saturday at our local yarn shop, I found myself oohing and aahing at the lovely skeins of Noro yarn they had in stock. I chose one for my mom to play with and one for this project. In barn buddy tradition, I’m making a friend a cowl for her birthday. It will come in handy to wear while riding and puttering around the barn in the cold(ish) weeks we have here. 


I chose a pattern out of my book of slip stitch knitting and knit until I ran out of yarn. Simple! The pattern itself, not so simple. There are a lot of cable crosses and maneuvering of yarn onto different needles that are required and some manual dexterity was key in getting this to not take forever. I fiddled around until I could hold all three needles in such a way that the cables weren’t cumbersome. Once I got a rhythm established it went pretty smoothly. The fun part was seeing new stripes of color come off the skein and into the fabric every few rows. 


I like the way the pattern turned out. Pairing a simple single texture with the more exciting self striping yarn worked out nicely. I’m calling it sustainable fisheries for a couple of reasons. First, the recipient is really interested in the sustainable seafood program at the Monterey Bay Aquarium. Second, the pattern reminds me a lot of fish netting on the right side and waves on the wrong side. Seemed appropriate.


These cool blue and green colors are right up her alley, and I’m happy to say that after blocking the finished piece will wrap around a neck twice to stay out of the way while riding. I hope she likes it!

Pattern: Zlaty Dest cowl (my Ravelry page)
Yarn: Noro Taiyo in color 124
Needle: US 9

Sunday, December 15, 2019

I love this hat

I started this hat late yesterday afternoon and finished it early this morning. And I love it. I am really enjoying the color combination of these four leftovers of madelinetosh dk yarn, the stitch definition, and the way the color work pops. Super excited for my dad to open this gift on Christmas morning.


The pattern is a free one from tincanknits called Anthology. They give you a recipe for the hat, a cowl, and I think one other thing in the pattern as well as a bunch of colorwork charts. I ended up finding a different motif on their website called clayoquot that I liked better than any of the charts in the actual pattern, so I referred to a picture of that and used it in part of my hat. I started with the brim in dark gray (until I ran out) and then finished with the beige. The clayoquot pattern then morphed right out of the brim really nicely in a way the makes the overall color transitions look great. After one repeat of the motif I improvised my way up the rest of the hat, dictated by when I ran out of the beige. The crown decreases were really easy, and I still think the whiskey barrel brown is one of my favorite colors to knit with. 


I added this spiffy leather tag on the brim, which is witty and true for both hat and wearer. 

Pattern: Anthology by tincanknits, free on Ravelry (my Ravelry page)
Yarn: madelinetosh dk in 'el greco', 'court and spark', 'terra', and 'whiskey barrel'
Needle: US 4 and US 6

Friday, December 13, 2019

Julekuler 2019

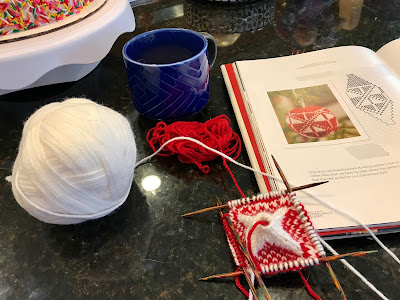
I've been busy making little potato chip knitting projects (i.e. julekuler) among the other crafty things that have been happening lately. These are great things to sit down to a football game with, and there's lots of that going around this time of year! This is the second year of julekuler knitting from the Arne and Carlos book Dave got me last year, and it's just as fun this time around as it was the first.


The patterns above are: Bird on Branch, Greek Cross, Xs and Os version 1, Hearts, Secret Rose, and Handcraft Border from the book. I wanted to try out some of the patterns that had lots of cross/diamond-like patterning to them. I think those are my favorite type of designs. And of course, the bird I made in red as a cardinal, in my mind at least. I miss hearing their chirps since we don't have them out here in California. 

The ball below is a very special one I made for Andrea, who is a puppy raiser for an organization that pairs service dogs with veterans and autistic children. Elwood was a black lab she had for almost two years and is now paired up with a teenage boy helping him through life. He was a wonderful dog and it is so rewarding knowing he has a job at last! I found this paw chart online and adapted it for the julekuler pattern. If I had to do it over again, I'd leave the toes all black rather than trying to checker them, but this one looks cute too. 


They were all steamed, stuffed, and finished this afternoon. Some may be destined to be gifts, but the majority we will keep and grow our collection year over year!

Tuesday, December 3, 2019

pillows of plaid a-plenty

Dave has always made fun of me for my excessive number of throw pillows. In fact, in the last place I had agreed to get rid of some of them by making pillow covers and gifting them to people. Buuuut since we got the house our throw pillow demand has gone up, especially with the fabulous couch we have in the living room downstairs. I'm pretty committed to nesting and decorating for the seasons (we'll see how long that lasts!) so the last trip we took to the fabric store Dave helped me pick out some prints to make pillow covers of our own for the living room. 


He's been big into stags/reindeer the last couple years and there have been many nice prints to choose from lately. We also wanted to try to keep that room more of a red/white/gray Scandanavian vibe for the holidays this year so I kept to that palette for both prints, the backing fabric, and thread. I improvised my way around making a 20" x 20" pillow cover by piecing the front, adding batting, and then stitching those layers together before adding the back. For the backing I used a heavy duty gray canvas that I've had forever. It must have been a remnant I picked up somewhere, but I've got a lot of it! It's perfect for pillow backing and makes the end result much more professional than regular fabric would. 


The zipper was a 16" zipper that I installed with fabric tabs on either side. It wasn't difficult at all to put in and I really like the look of a contrasting zipper showing. The only "quilting" I did on the front was this very appropriate decorative stitch around the center panel that looks like snowflakes when done in white. It adds a touch of whimsy and some texture to an otherwise pretty simple pillow.


It was fun doing a project for the house and also one that was quick to finish. They are installed and being enjoyed by us and the kittens already! Here's hoping we can keep the cat hair off for a while... 

Monday, December 2, 2019

be our guest

Last week I went stash diving. While it's all very well to have a stash of fabrics to make quilts from, sometimes it's nice to grab some fabric and play with smaller projects and bigger prints. Each of these prints wouldn't have been great to cut up, but work out great on big drawstring bags. 


We are super excited that we will have a house full of family for the holidays this year, and because I think it's fun I decided to make everyone their own laundry bag for traveling. I love the one I made myself - I take it to all the horse shows and every other trip I go on - and Dave has a couple he likes to keep with his suitcases too. It was fun to pair up prints and see how these each came together with their own personalities.


I think the hardest part is picking the fabrics out, and after that it's just a few seams, some pressing, and a bit of top stitching to a finished bag. Lumiere would be proud!

Sunday, December 1, 2019

a two hat kind of day

Some days you just whip through a couple of stash busting projects, and one of those days was today. Boom! Two hats. Very gratifying.


I found myself rummaging through my yarn to see what I had that I could make fast holiday projects with and found these two chunky colorful yarns. For the red one, I used a pattern I saved on Pinterest a while back, and for the rainbow I repeated the very same pattern I had already used with this yarn to make myself a hat back in January. I love how they both turned out and they'll end up going to my nieces who are coming to visit. 


Of course, any hat could always use a pom pom. I don't add them to all of my hats, but I sure want to.  I snapped up these two pom poms at the local yarn shop, Continental Stitch, on Small Business Saturday (which was really fun to "celebrate" in Morgan Hill, by the way - so many great local shops!). I couldn't really decide which way I liked them best, so consulted the expert - Mom! She liked the black on red and buff on rainbow best. I didn't start out thinking that's how it would go but seeing both options side by side, I agree. I like that one is sort of Stanford pride and the other will be a nice way to go out together and "match" but hers will have a pom pom so will be way cooler than mine. Hope they like them!


Pattern for red hat: Chunky Catamount Beanie, free on Ravelry (my Ravelry page)
Yarn: Premier Yarns Serenity Chunky Prints in 'red ochre'
Needle: US 11 and US 13

Pattern for rainbow hat: Swirly Smooshy Chunky Beanie, free on Ravelry (my Ravelry page)
Yarn: Loops & Threads Facets in 'peridot'
Needle: US 13

Saturday, November 30, 2019

anxious for fall

Finally finished! Technically it's still fall ... the season for which this quilt was intended, but we are quickly moving into the holidays so it may have to hibernate until next season. Still, it turned out great as a first quilt in the new craft room and a housewarming gift from me to us. I love fall colors, decorating for fall, brisk fall days, and this seemed like a nice reminder of both that and the fact that we finally found a place to call our own this year. 


The batik I chose (online!) for the back turned out perfectly. Some of the prints and colors on the front were a little out of the box for 'autumn' but the awesome orange backing balances it out nicely and takes the piece firmly into the autumnal look I was hoping for. I'm calling it "Anxious for Fall" because, while moving was exciting and the achievement of a long awaited life goal for us, it was also a very trying and anxious time for me. I can recall working on some of these blocks on a couple of days where I just "couldn't even". It seems funny to commemorate something like that, but if I can laugh at it in retrospect then it doesn't seem so bad. 


I was going to do some hand quilting with pearl cotton, just a couple of lines of rusty orange to make my reference 'x' for the V shaped quilting, but I couldn't find the color at any of my local shops and didn't want to chance picking a color from my computer screen. So instead I did all machine sewing, including the orange 'x'. The color I finally picked for the majority of the quilting is a gray with a greenish undertone. There are so many shades of gray aren't there? Somehow this shade seemed more toned down to me than the bluer or truer grays. It took me an evening to get the quilting done, and wasn't nearly as bad as I thought it was going to be in terms of maneuvering the quilt through my machine.


I made a scrappy-ish binding from two of the Indie prints with more orange in them. Scrappy-ish meaning I used up the first print first than added strips of the second. I'm pretty sure I had just enough to get the binding done, so that's pretty perfect for stash busting purposes. It's about 90" x 60", so a really good size. 


I had intended to do some hand quilting in the tan colored border, but the aforementioned challenge of finding the right color thread makes me think I'll leave it alone. Maybe some day, but it looks really nice just plain too. I really like the way the thin inner border turned out. I normally don't think of putting borders on quilts, mainly in order to keep them looking more modern vs traditional. But in this case even with the borders and traditional churn dash blocks this piece still looks pretty modern to me! I'm very happy with how it turned out and looking forward to getting some good use out of it. 

Tuesday, November 26, 2019

hipster hoopla

Inspired by finishing one hoop, I pulled out the supplies for yet another I've had waiting to be made for a while. I can't recall when I got these cute wooden pieces, probably a couple years ago after the holidays. With them I also had two remnants of flannel plaid. I chose this green one over a more simple red and gray because I liked the extra contrast and smaller patterning better for this. 


This was pretty simple. Originally I had the fabric in the hoop so the squares were just straight across and vertical like a piece of graph paper, but somewhere along the way I decided to rotate it so they were on point. I cut the fabric a couple inches away from the hoop (much more overhang than the flower hoop) and used pearl cotton and a running stitch to cinch it taut. Then all I had to do was hot glue the wooden ornaments to the fabric. I have to say, the hot glue gun smell reminds me so much of being a kid -- that's what you get when you have a really crafty mom!


Instead of leaving the back of this one open, I found myself a piece of felt and used a blanket stitch along the edge to close it up. I used red pearl cotton, which looks quite festive. It's funny it took me so long to get started on this because it didn't take very long at all to finish! Very happy with the result, and I bet Dave has totally forgotten I was going to make this for him, so it will be a nice surprise at Christmas. 

Monday, November 25, 2019

long time coming

As I was cleaning up my craft room today, I found myself moving this from place to place. It's a hoop I started way long ago, like long enough that I don't really remember when. It got stuck in the little ottoman in our living room in a nearly finished state, but apparently forgotten. I wasn't quite sure how to finish it at the time.


I went in the ottoman the other day looking for something else and pulled this out to put in my craft room somewhere in the way so I'd get it done. Turns out, I know myself pretty well. Literally all I needed to do was trim the fabric on the back and pull it tight with a running stitch. Why was that so hard?? Unknown. 


I'm happy it's done now, and am enjoying the fact that this was a long slow make that took several stages. I can remember having the felt flowers on there and leaving it for a while before I went back to add the whimsical embroidery. I think I'll find a nice spot for it in the bedroom. 

Tuesday, November 12, 2019

it's that time again

It's heeeeeere! Julekuler knitting season is once again upon us and I'm starting up with gusto. I love knitting up these little guys - instant gratification that can be finished in just a few hours and there are so many different patterns in this book to keep things interesting. 


I've already gotten a few traditional designs knitted up, and I experimented with a three-color puppy paw. If you can find a chart of something online or set a design into graph paper yourself, then you can stick it on a julekuler. 


I'm a big believer in leaving November for my birthday and Thanksgiving rather than getting on the Christmas train early, but for these I make an exception. Onward!

Friday, November 8, 2019

get basted

Oh so not my favorite part of making a quilt. But it's so much easier now in the new craft room, the gift that keeps giving. Instead of trying to do this on a dining room table, or a floor, or the tiny card table, I cleared off the counter-height cabinet and layered everything together there. Having the quilt be just the same width of the cabinet certainly helped since I could literally just stick the halfway line on top of the cabinet for each piece, unfold, and let gravity do it's work. 


There was obviously some smoothing along the way, but it took me less than half an hour to pin baste this and my back didn't protest once. Hallelujah. So now I have a quilt sandwich sitting there tempting me to get out my machine and start quilting. Problem is, while I know what I want to do to quilt it, I'm not sure yet about thread color. More thinking required! 

Wednesday, November 6, 2019

festive pumpkin patch

In keeping with the festive fall nature of my projects, I have some more pumpkins to share. This is a wall hanging (about 2' x 3') pattern I acquired on our recent trip down to the Monterey Bay Aquarium. It took me no time to get it all put together and was incredibly fun to make. 


After Dave, his mom, and I finished a jaunt through the aquarium I mentioned that there was a quilt shop in nearby Pacific Grove. It was literally a 5 minute drive from where we'd parked in Monterey and we found a spot to park just outside the front door. It was obviously meant to be. The place was the best quilt shop I've been in yet. I wanted to take all the fabrics home with me, it was brightly lit, well organized, and there was even a section where they keep a rotating exhibit of quilts going. I was so excited about such a great find. I'd been looking around in the shops closer by for Halloween fabric bundles to make myself some scrappy pumpkins but having no luck. Lo and behold the perfect quilt shop was made even more perfect by having said bundles. Add in a table of fat quarters to choose from and I left the shop with all the materials to make a pumpkin patch of my own with a pattern I also found there. So good. 


I cut the fabrics on the kitchen island one afternoon and got to sewing shortly after. It was really fun to play with all the fabrics and see how the different combinations worked. I especially like the patchwork square pumpkins, but the combination with stripes and uncut blocks of fabric really make the overall pattern interesting. Dave picked out the background, which is a linen-like woven black and gray that I really like. It was finicky to work with but worth the effort. 


I quilted it with gray thread on top and green in the bobbin using random straight lines that mimicked the backing fabric. After auditioning both the green and the backing fabric for binding I chose the black backing fabric and made my own binding. I stitched to the back and then tacked down to the front using a straight line near the edge. It turned out very well and is even kitten approved. Now we just need to find a wall for it to hang on for the rest of the fall season. And I also need to go back to that shop.... 

Tuesday, November 5, 2019

lucky stars, finished

I lucked out on this one. I wanted to make myself a quilt that was the same as the one I made my grandpa for Christmas in 2015. I had plenty of leftover of most of the prints, but unfortunately the background fabric and the remaining prints I needed were nowhere to be found. In fact, all of the fabrics weren't available anywhere I looked, online or otherwise. Bummed out but stubborn, I got to thinking. With the amount of scraps I had of background I could at least make one block of each color combination if I sized down from a 16" finished block to a 12.5" block for a decent sized wall hanging. Serendipity!


Thanking my past self for keeping all the bits and pieces of these fabrics together, it was quick work to piece together the blocks and then get the sashing and cornerstones sewn up. I had just the right size piece of batting in the closet and a good chunk of the metallic deer head backing fabric left. I got both backing and binding out of it, and I even have a bit left over for something else. I miss this fabric especially, please bring it back! 


I quilted the same way I did the original, 1/4" down the sashing and an 'x' through each block using white thread on top and variegated gold/brown on the back. I sewed the binding to the back and then finished it on the front with a straight stitch rather than zig zag so the deer still show. While I miss not having the quilt I made him, this wall hanging is a nice reminder that's cheering up the entrance to my craft room. 

Wednesday, October 23, 2019

pumpkin parade

I can thank Pinterest and my mom for this latest craft project. If you combine orange yarn, green pipe cleaners, and some twine you end up with pumpkin garland! 


One of many fun things about having the new house is that there are so many opportunities to be festive. I made this garland not sure where it would end up, but it's found a great home brightening up my kitchen for fall. 


It was the work of an afternoon used up one skein of yarn to get twelve adorable little pumpkins all strung up in a row. Pumpkins, people. Gotta love 'em. 

Saturday, October 12, 2019

shetland, finished

It's done! And I'm in love. This is the most ambitious knitting I've done to date and I am so very happy I went on the adventure. The pictures simply do not do justice to this amazing piece. It is large and cozy. I can certainly see wrapping up in this on chilly days. 


The yarn I chose, an alpaca/wool/nylon blend, lends the shawl great weight and drape without being bulky. It's also just a little bit "gritty" if that makes sense. It's not a soft silky feel but more of a rough and tweedy hand, and I think that suits it very nicely. I would absolutely use this yarn for a shawl again as I really like the texture. 

The color is difficult to capture on camera. It's a navy with flecks of magenta/purple in it appropriately named 'blueberry'. I can remember when I bought 5 skeins of this lace weight yarn at the shop and being asked "what are you going to make with all of this tiny yarn?!" Well, I don't think the lady believed me when I told her a single Shetland shawl, but I have just under half a skein left! It just ate up yardage. 


It is fun to look at this project and remember the places it's been with me as I worked on it, especially the trip over the pond to Scotland it took. It's even more special to me having seen the cultural birthplace of this type of shawl. Though we did not specifically go to Shetland, I do see echoes of the mainland highlands in the patterns as well and that is a pretty cool connection. 

I very much enjoyed the knitting once I got going, and I'm looking forward to another project from Cheryl Oberle's Folk Shawl Knitting book soon. 

Pattern: Fir Cone Shawl (my Ravelry page)
Yarn: Berroco Ultra Alpaca Fine in 'blueberry mix'
Needle: US 7 (4.5 mm)
Size: 6 feet square