Friday, July 31, 2020

Cloud Dweller

Well, I’ve got that winter hat problem all taken care of. It was obviously super important that I start and finish a chunky winter hat in the midst of the summer. Just in case? Regardless, I made a hat and I’m pretty pleased with how it turned out. 


I’ve had this yarn in my stash for a while now. I picked it up at Knit, Purl in Portland on a Thanksgiving trip we took in 2015 simply because I couldn’t pass up the color. I just love the combination of sky blue and dusty purple. I would totally make myself a big comfy sweater out of this stuff. The cables pop out perfectly and the overall heft of the hat is really satisfying. 


The other satisfying part? This pom pom. Of course I had to make a nice big pom pom to top it all off. I used my 3 3/8” gadget and wrapped generously to end up with this really dense beautiful ball of fluff. I attached it through a button on the inside of the hat hoping that will help it to stand up a bit better instead of sagging off the hat under its own weight. I used up almost as much yarn on the pom pom as I did for the hat! Totally worth it. 

Pattern: Illume, free on Ravelry (my Ravelry page
Yarn: madelinetosh chunky in ‘cloud dweller’
Needle: US 10 (6 mm), US 8 (5 mm)

Monday, July 27, 2020

week nineteen

I'm about four weeks on from the last time I posted any knitting projects. It's been a summer of sewing for the most part, but that doesn't mean that I haven't sat down a bit with needles and yarn. I have only a couple of small projects on the needles and a pretty empty mental queue at this point, which seems about right if I'm going to try making any knitted things as holiday gifts this year. 


I've been enjoying the chunky texture of this hat as it comes to be. I love the subtle peeks of purple in the otherwise sky blue base. It should work up to be an interesting looking fabric that I think will match my dusty purple winter coat really nicely. While I really like the driftwood Lykke needles I'm using, I'm finding that I wish I had a circular needle of the appropriate size instead because of the cabling. It gets a little bit fiddly, and this is supposed to be my easy project!


And speaking of fiddly, I have finished the body of one fingerless glove so far and have a start on the second. I will leave the thumbs (my least favorite part) until last. I am very happy with the way the colors are looking with the pattern, and super impressed that some of the complicated looking details are so easy once you know how it's done. I'm solving some knitting mysteries here, people. I've really enjoyed working on these so far, but I definitely needed to switch over to the chunky hat or risk stopping knitting forever! That's a (slight) exaggeration, but my hands and my brain really craved a simpler more mindless piece to break up the counting and yarn wrangling this pattern requires. 

Saturday, July 25, 2020

Christmas in July

I was planning on getting a start to my julekulers for the year today, but oh well! I found another project that grabbed my attention even more. There's always the rest of July to get those going. This one I got started last week after finishing up yet another quilt top (photos to come) and still wanting more fabric play. I have been really enjoying the Missouri Star Quilt Company's tutorials on YouTube lately, and this is something I saw there. It will end up being a tree skirt made of hexagons done in a unique quilt as you go fashion.


I purchased the pattern and templates from MSQC, but everything else I had in my stash already. The batting is scraps from other projects, and those holiday prints I bought at least a couple of years ago meaning to make myself a patchwork tree skirt out of them. I guess it's finally time! That gray looks familiar because it's another chunk off of the four yards I bought the other week when I needed background for my brother's quilt. That extra yardage is handy, like I said. Cutting these out didn't actually take very much time despite the extra complexity of cutting around templates. Strategic folding of fabric strips made quick work of it.


Once I had the stacks ready to go they got popped into my big fabric basket that I've been using for "active project stuff". Mom and I try to have a call every week to chat and craft together over video - which is super cool - and so I had these out this week while we talked. I got almost a third of them pinned up with the pins I have and they are ready for pressing and sewing. I'm really interested in seeing how they start to shape up as I get going. Right now they're looking a little rough! A good press should do the trick, I hope. I thought about hand stitching them together like English paper piecing, but if I want it done by this holiday season I think I'd better use the machine. 


Monday, July 20, 2020

week eighteen

This last week I spent some time taking stock of all the quilts I have in process hanging in my studio. I was running out of places to put folded quilt tops and hung quilt tops and.... quilt tops. The solution was to clean everything up, scraps and all, and start cutting some batting. I cut batting for three of the five and I folded two of them up with labels and set to basting one. 


This one was just a touch too wide to use on my new quilting frame so I cleared off my cutting/ironing counter and pin basted. I knew I wanted to use straight lines anyway, so it’s ok that I’m using my machine sans frame. Today I got about half of the lines done in a really nice orange thread on top and a dark gray on the back. It’s looking super so far and won’t take much more time to get it done this week. 

Tuesday, July 14, 2020

i dream of blue turtles quilt top

My super big purple and teal monster is done! Well, the top anyway. I did make the pieced borders like in the pattern, but since my blocks ended up a smidge smaller than they were meant to and the borders were (ahem) perfect, they didn’t line up. I definitely could have fiddled with them to make it work but instead I opted to skip that part and do as wide of a border as I could with what I had left of my favorite purple print. The pieced border? I’m going to try to use it as a really interesting binding for this. 


The pattern I’ve used is called Eiderdown by Larissa Keys and I distinctly remember buying it at the local quilt shop down here just about a year ago when Dave and I first came down to check out the town. It’s so funny how life works out! From a quilt pattern to a house... 


We went through a period where we were listening to a lot of Sting (my favorite) which coincided with the making of this quilt top. Somehow that combined with the ocean-ish feel of the teal background made me think of turtles and “I Dream of Blue Turtles” sort of popped into my head as a name that seems to have stuck (Sting’s first solo album is The Dream of the Blue Turtles). I’m considering trying out the longarm quilting services of another quilt shop we’ve recently discovered and I do think they can do an edge to edge turtle pattern. How cool would that be? 


It’s ended up measuring just about 80” x 100” and was so large I had to have Dave hang it up on the porch by the gutters so I could get a good picture of the whole thing. I’m really enjoying the traditional blocks with quite unconventional, bright colors. And also the fact that we’ve got a porch :)

Monday, July 13, 2020

week seventeen

It's funny that as much as I resisted making masks at the beginning of all of this, I've been making them pretty often lately. And I've even had a bit of fun with it. Is that permissible? Matching fabrics, playing with color, and finishing something quickly has been the fun part, at least.


This latest batch is for a friend who requested "professional" ones, but I couldn't resist making him a couple of fun ones as well. I figure the grays are pretty good for those work calls and the plaid flannel lining is inoffensive and will be hidden anyway. The green mountain one matches one I made for his daughter a week or so ago, and the sushi is a combo that I've used for Dave and I enjoy a wide smile every time he wears it so I figured it was worth a share.


We went by their house yesterday for a socially distant lunch, some pool time, and meeting their new puppy so I got these done on Friday and tucked them in my bag to remember. It was a nice time and was fun to see some people face to (masked) face, but I couldn't help but still feel strange being out and about. I suppose that too shall pass, just like this pandemic will eventually. It is odd to feel conflicted about seeing friends again, though. The puppy, however, was a universally wonderful experience.  

Wednesday, July 8, 2020

minion madness quilt top

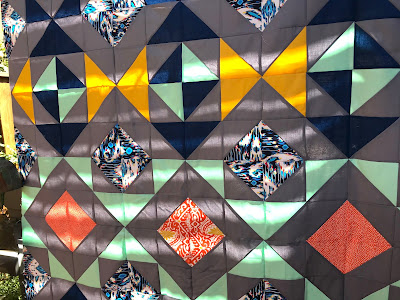
At some point I'll start quilting all these tops, but at the moment I'm having a lot of fun piecing them. This top for my brother didn't take very long at all. It was a really fun one to put together, too. The design is made up of exclusively half-square triangles which makes this kind of quilt really appealing for playing with layout and geometric designs. The overall look is quite different than the Nordic Triangles design that I used but that is the exciting part of playing with color and values. I'm loving the colors together, and the combination of the solids with the ikat prints (and one polka dot) is really nice. I might try some more solid-only work in the future because those parts are my favorite sections of this quilt. 


Instead of assembling it together row by row I chose to make four patches, then four patches of those four patches, etc. until I came to the point where I was assembling three large rows. I think this helped me keep track of my points better than a row by row assembly would have done, especially because I did not trim/square up the HSTs after I made them all. 


I'll have to think a little bit on how I want to quilt it. It's just a smidge too large for my fmq gadget so I'll be doing it the "old" way which probably means a lot of straight lines coming my way. It's gonna be so fun to get the minion backing on, and I even found some great minion eyes print for the binding. Hehehehe. 

Monday, July 6, 2020

week sixteen

Dave bought wood for this project just days before our quarantine started in March. Of course we didn’t know then that we’d be at home for so long, but it turned out that this tack locker was a great project to keep us occupied in the early weeks of the pandemic. It’s been functional since mid-May and got it’s fabulous trim treatment in June, but this weekend we put the final icing on the cake with the bee decals. On the 4th Dave bbq’d on the driveway while I fiddled with a popsicle stick and the bee. 


I’m super happy with how it turned out. It fits (nearly) all of my barn stuff and keeps me organized and contained so I’m not looking in five places for things to grab and take with me. I especially love that we finally found a home for my random assortment of drawer knobs from Anthropologie. Along with the wall paper we chose, they really make the whole thing quirky and very ‘me’. 


There are cubbies on the bottom where I have room for blankets and saddle pads, and a nice big area under the saddle rack where I can keep my barn bag with all my grooming tools as well as a wash bucket behind. The shelves are all lined with a clear plastic shelf liner we picked up at Home Depot, and that has worked really well keeping the paint from getting scratched up. 


We modified the right hand side of the bottom cubbies to have a cut out so my helmet/boot bag could slide in and be stored. That’s way better than having it floating around the garage to catch sawdust. There’s still a half shelf in there where I keep a box of more leather cleaning things. 


This wall paper was totally worth the expense. I found it on Spoonflower and it’s pretty perfect. We even put some of the extra up on the panel in the right hand door so there’s a sassy little palomino looking out from between the bridle hooks. It was quite easy to get in there, though I did have some apprehension about it, and it’s stayed on really well so far. Instead of the wooden saddle rack in the design I opted for a metal one that we just bolted through the back panel. 


The vinyl bee decals were purchased from a vendor on Etsy. They’re pretty perfect and I think just what Dave had in mind when he first suggested doing a painted or vinyl design on the doors. Hopefully they’ll stick on for a while; the rough wood isn't’ exactly the perfect substrate. If it starts to become an issue a layer of clear coat might be in order. 


Very fun project for this year and a really great way to spend some time in the garage doing some woodworking with Dave. Brought back memories of building sets in high school, for sure! 

Friday, July 3, 2020

a festive fourth

Well here it is, my second wall hanging for the house. My Halloween pumpkin patch finished up rather quickly once we moved in, but it took longer for the next to come around. The holiday horses are still basted and folded...... 


I used this little piece of improv as the experimental first voyage of the quilting frame Dave got me for my birthday last fall. It took a bit of fiddling to set everything up, but now that the bits and pieces are assembled it should be quicker the next time around. I have to say, I think it’s going to be great once I get used to it. I’m very good at drawing, but less good at drawing while moving the paper instead of the pen. That is how this works, in contrast to a long arm where you move the needle like you do when you draw on paper. 


I had grand plans of doing a bunch of straight lines to echo different blocks, but decided to opt for a loopy all over design while I got used to driving the new contraption. It was a bit of a chore to get tension right - definitely had it right for two passes and then had to take out the next FOUR because of snarly thread on the back. In the end I put the machine back on AUTO and it worked out fine. I read somewhere that you needed to take it off of auto and ramp up the tension for it to work right. That seemed to work out in the beginning but I made a small adjustment partway through and BAM. Snarly thread. 


I found this great striped fabric for the backing and bought enough so I had plenty left for binding. Gotta love a stripe for binding. It also hides some of the imperfections from the machine quilting on the back, even with the white thread. That’s the side against the wall anyway, right?? Like I said, the quilt frame is going to take some getting used to. 


While it wasn’t the geometric coup I had in mind, I do think it’s pretty festive looking. The loops give it lots of texture and actually contrast with the highly angular patchwork pretty well. I suppose if you squint they could look like fireworks. And it’s done in time for Independence Day! Score one point for me.