Friday, May 25, 2012

Feeling Well Stocked

I'm so proud of myself. I resisted the urge to buy fabric! I've mentioned that I signed up for this Handstiched Class... the decision was more than a little motivated by the lovely class quilt Rachel designed for it. One of the three options for each project set will include an installment in the quilt so we can use all of our learned skills to make a large project. What a great idea! At least, I thought so until I thought to myself "there's no way I can find enough solids in my stash to go with ... any of my prints"-- the supply list we got calls for like 8! The horror. 

So, I decided I would just do the other projects and come back to the quilt after the class was over and I had a concrete plan and some time to slowly acquire the fabric. Then somehow, a week later, a color combination just popped into my head. I have these two large cuts of linen in a light linen color and a bright blue -- let's do blues and neutrals! After taking another look at the quilt and a good gaze at the stash, I found 7 (!) solids that I think I'll have enough of to make it work: the two linens, two corduroys, white, turquoise, and green. I've got an open mind about those cords, they should add some interesting texture. 

Solids
Having the black corduroy means I can probably use the array of black and white prints I have, and I have lots of blues. I especially like how a couple of fat quarters from a bundle of muted fabrics I bought a while back have a new, brighter life in this context (3rd and 4th from the right). And just because I wanted some warm contrast to all the blue and green, out came some Summerlove and Heirloom bright oranges which, happily, also have some blue in them. I'm not sure which of those two I'll use for the center medallion, but it will be one of those for sure.

Prints
So now I'm all excited for class to start. Well, I was excited before, but I'm really happy I'll be able to work on this quilt now after all. And I'm pleased to have been able to assemble this lovely stack of fabrics without buying an inch! I'm excited to see how it all will come together, and I have lots of embroidery thread colors to play with, too. Fun!

All stacked up and ready to go!

Thursday, May 24, 2012

Bags for Beads of Courage

A week or so ago, I read this post at City Stitches about an organization called Beads of Courage. I think this is a fantastic thing. While kids are in the hospital being treated for serious illnesses, they receive a bead for each milestone they reach, treatment they receive, in some cases holidays they are there (birthdays, 4th of July, etc) to encourage them.  This collection of beads can serve as a reminder, a communication tool, a motivator, so many things. 

Beads of Courage accepts donations of handmade beads (and even has some tutorials on how to make them!) to give to their patients. Of course, I don't make beads, but I can sew. There is an opportunity for that, too! Where to put all those beautiful beads once they've been collected? In a bag, of course! The website has instructions for how to put together a bag, and even has BoC labels you can request.


If you're familiar with Craftsy, there is also a user there who has posted a PDF pattern for these; this is what I used. Here are my first two, aren't they cute??? 

The frog seersucker fabric on the left is adorable, and I made that one first out of whole pieces to test out the pattern. The bag on the right was my first attempt at using the improv chevron block tutorial here. I've seen lots of quilt blocks being made this way and thought, why not? The fabric is all Eric Carle Very Hungry Caterpillar scraps that I had from making my oldest niece a comforter way back when. I love the print with the little guy crawling out of the fruit. 

These were fast finishes, and satisfying for that reason as well as the intended use. I just need to add on the ribbon so they can be cinched closed. I had a nice evening of sewing, and I'm sure I will make more of these in the future, especially with more of those caterpillar scraps!

Tuesday, May 22, 2012

You've Got Mail!

Because of the horse show this last weekend I didn't have any daylight time in the craft space to take pictures of my most recent goodies. But I'm so excited to share them, so please bear with the less than ideal lighting.

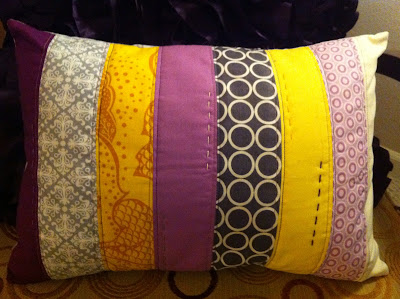
A couple weeks ago, Maureen Cracknell was nice enough to write about my work on her blog. (I had sent her a needlebook I made after I saw her lovely Summerlove Bird Pillow.) This tickled me because I love her work and her blog! To top it all off I received a fun package in the mail shortly after. I was so excited when this pillow cover slipped out of the package.


How great is that? Not only does it match our main space colors perfectly (yay for yellow and purple!) but it is the very pillow cover I have been wanting to make for myself using Maureen's tutorial for such a long time! Happening upon that tutorial last August inspired me to get back to sewing again and introduced me (through hours of clicking links on her blog) to the world of modern quilting, so this was an especially special treat! I bought a pillow form and it is now in a place of honor on "my" chair in the corner. Highly visible from everywhere. :) Thank you so much again, Maureen!


The second wonderful thing to come in this package was felt - a whole stack! She was so thoughtful and even cut the pieces to be the dimensions of the needle book I sent her. Needless to say I will be having fun making more. This felt is really nice quality and comes in a variety of beautiful colors. It feels just like the felt I found at the shops in Amsterdam - denser than most of the precuts available at my average crafty store here in Palo Alto. Maureen is planning on selling it in the fall. Look at the pretty rainbow (new picture updated)!


Also, today I was happy to receive my student kit for the Handstitched Class I enrolled in over at Stitched in Color. Rachel is another person whose blog I frequent and continually find inspiration at. I'm excited to have the opportunity to learn from her and benefit from her creativity and obvious love for teaching and spreading her knowledge. I'm currently trying to clear my plate of large, ambitious projects so I'll have the time to enjoy soaking up the handstitching coming my way.

Thank you Mr. Postman for bringing me such wonderful things in the mailbox over the past weeks!

Thursday, May 17, 2012

Slowly slowly

Caribbean Blue is coming along, but slower than I had anticipated. This last week has been full of busy evenings out and about and with chores around the house. There is also a horse show this weekend, so I probably won't make too much progress.

I had a marathon cutting session to cut all the fabric and a good long sew after to make patchwork strips. The pattern has you make tubes by piecing long strips together lengthwise, then cut across those tubes to achieve strips of the various fabrics without needing to cut out individual pieces and sew the patchwork together piece by piece. Clever!

After I finished those, I tried out layouts on the living room floor. It's the only area big enough to accommodate a quilt this size besides the bed! I used post it notes on each strip to mark the order so I didn't have to worry about keeping track when I rolled up and went back to the card table.


I've got the bulk of it all sewn together, just the corners left. The whole top will require trimming to attain an actual rectangle - for now it is a rough placement of strips on the diagonal. I have to go back to the floor so I can figure out what pieces I need to fill in to have the size quilt I want in the end. Hopefully I won't need to cut more fabric, I would like to have some of this lovely voile leftover. But I'm really just eyeballing it at this point. See those plant leaves on the floor? Those are my "size markers" I put down to mark the corners of the finished quilt. Very high tech.


I'm not sure yet what the back or binding is going to be, but I'm getting close to needing to decide! The pattern calls for one big piece of voile in a solid turquoise for the back, but I wonder what a quilt totally made of voile will be like?? On the other hand I'm skeptical of using any of my cottons because I'm afraid the voile will lose its liquidy drape. A problem for another day!

Saturday, May 12, 2012

Mom's Day Surprise

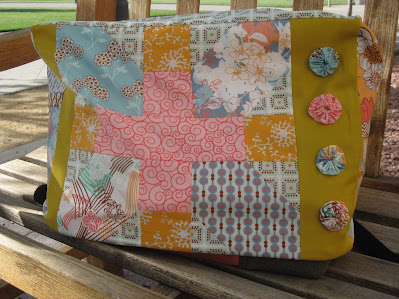
I am pleased to say that I have finished the sewing machine cover, it is all boxed up and ready to ship off to a special person, my mom :). The following post will mainly be pictures to share the many details that went into this project since starting on Sunday.


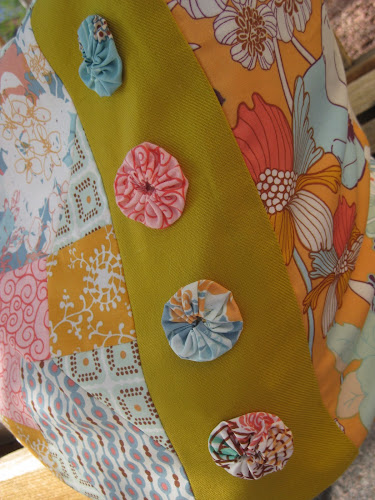
To finish off this side, I added a quartet of yo-yos next to the large quilt block. Rather than sewing them on I used fabric glue.


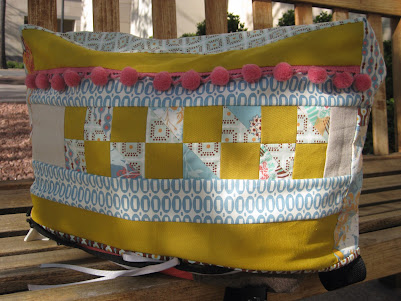
The patchwork and pom poms on this side are so cute it made me rethink which side is 'the front'. I expect Mom will have a tough choice on her hands! I especially like the pezzy print here.


A handy pocket to store odds and ends. I think the two dot prints play especially well together here. The brown dot print is also used around the bottom of the whole thing as a binding. (Please excuse the slouch, it was fit on my messenger bag in these photos)


For the lining I used this fantastic home dec weight peacock fabric. The weight gives it some structural support and the peacocks lend some hidden quirk!


My favorite part might be the yo-yos, though it was difficult to choose. I had so much fun thinking up all the pieces to this, and I couldn't be more pleased with the final result.

Friday, May 11, 2012

Caribbean Blue, the journey begins

I have started a new quilt. This recent splurge of small projects has given me the time to store up the motivation to work on another large project. I'm sorry to admit that I gave up on the Retro Flower quilt (which was next in my queue) before it even got started; I just wasn't feeling enthusiastic about the fabrics I had, and working on a large curvy project like that would have been no fun without full enthusiasm. Another time!

But back to what I *am* doing...

I definitely feel enthusiastic about these fabrics! Amy Butler's Soul Blossom line has everything I love: vibrant color, funky prints, and a great set of fabrics with greens, blues, and aquas. And as a bonus, it connects me a little bit to my roots. The voile is so lovely to handle. I will admit the other day I purchased more of the peacock fabric in green/yellow to make myself something wearable in the future. (Modern Fabric Studio has these in stock)

I am calling this project Carribbean Blue because the Enya song kept running through my head last night as I cut these fabrics. I think it is appropriate, this combination of fabrics is a bit like sitting on the beach next to the Carribbean - fresh and breezy. And the colors are so beautiful and relaxing! Just like that song.

Thursday, May 10, 2012

Park Fountain necklace

As I have been sitting at my sewing machine these past few weeks my eye has kept drifting to the yard of Amy Butler Park Fountains print (from the Midwest Modern 2 collection) on the shelf in the corner. It's been sitting in my cabinet for a while, actually, as it was one of my first 'fancy quilting fabric' purchases back in November when I bought (other AB) fabric to make a yoga mat bag. I bought it with no particular project in mind but simply because I love Amy Butler fabric and the colors are two of my favorites, especially together.

I saw this necklace online a while back and have been thinking about it ever since. I finally decided to make one, and I must say -- really fun. I will be making more, methinks. The scale of the pattern on the fabric worked beautifully with the size of bead I used, and I had the perfect light gray grosgrain ribbon to use as a tie.


This one is off to a good home, but I might make myself one just like it!


Wednesday, May 9, 2012

I've got it covered

I am making a sewing machine cover! I had a lot of fun on Sunday morning making the Japanese x and + block for this, so I spent a good chunk of the rest of the day continuing to work in while the sun was shining into the room. Admittedly, there was quite a bit of time after the sun went down, too. 


Having no particular plan in mind, except knowing I wanted to feature this block on the front of the cover, I set to work. Having a limited supply of solids, I wasn't sure I had anything appropriate to go with these colors, so I put it aside and started working on the back. Bring on the improvisation! I sketched out and calculated the sizes I would need as though I were making this out of whole cloth. This way, as I put together the front and back, I'll know how big of a piece I am aiming for when they are joined. I am loosely following this pattern. "More like guidelines, really," as Captain Barbossa would say. 


I took these little half square triangles I had leftover from making the x units on the block above and played with them for a while before settling on this arrangement. I started out wanting to make a vertical stripe of hourglass-ish blocks or a couple of pinwheels, but settled instead on a horizontal patchwork strip.


I rummaged around and found a unique yellowy green fabric to use as the complementary solid. I wasn't sure about it at first, but the more I looked at it, the more I liked it. There is no green whatsoever in these fabrics, so it adds something new and makes the other colors pop. Also, I broke up the blue extravaganza that was happening on this side with some fuzzy pink pom pom trim. This is so far my favorite detail... maybe this will end up being the front side!


After adding the end pieces and a pocket, I of course had to try it on my machine. It is not sized for mine and of course it isn't lined yet so it's a bit slouchy, but it at least gets the general idea across.


Here's the side with the x and + block. It's missing something, especially considering it has to compete with that cute band of pom poms on the other side. I'll have to sleep on it...


Linking up to Work in Progress Wednesday at Freshly Pieced


Tuesday, May 8, 2012

pin(wheel)s and needles

I made another needlebook! This is where spending hours surfing the internet helps. I was inspired by pinwheel wall art I saw and decided to miniaturize it. Also, I learned a new embroidery stitch: the wrapped stem stitch. I used this to create the pinwheel sticks and make them look like striped straws. Add in some buttons and a little more stitching and voila!


Monday, May 7, 2012

x marks the spot

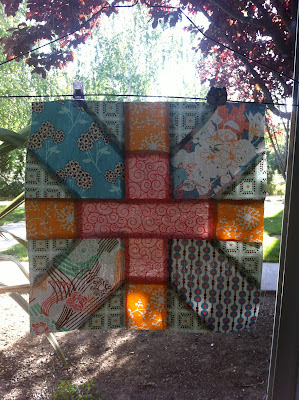
Ever since seeing this quilt made by the circles of do.Good.Stitches. for Rachel at Stitched in Color, I've wanted to try this quilt block. Apparently it is called the Japanese x-and-+ block, and I found a great tutorial for one (12.5" x 12.5") here. Eventually I'd like to make a whole quilt using this block, but for now I've got another project in mind. Shhh! It's a secret (for now).


I've cut into my Summerlove! These fabrics are lovely, soft, and the colors remind me of the Boardwalk down in Santa Cruz. Beachy indeed. I had this fun pom pom trim that I think will look cute with the (eventual) finished project and brings out the little bit of pink in these fabrics to balance out the blues and oranges. 


This was very quick to cut out, everything starts from squares! After making it, this makes sense but I wasn't expecting the piecing to be so straightforward. Ah, geometrical magic. Here are my squares all cut out and playing nicely together on the card table. 


To make the x sections, small squares are sewn onto big ones then extra fabric is cut away, effectively replacing the corner of the large square. This is accomplished by sewing from point to point on the smaller squares. After considering the extra fabric I was cutting off before cutting (what a concept!), I added a step: by sewing another line 1/2" away (perhaps visible in the top picture above) and cutting halfway between, I easily made my extra fabric pieces into half square triangles. Why not, right?? I've squared those up and am saving them for later. 


The piecing went very fast, and I am quite pleased with the resulting block. I took a cue from the tutorial and decided to make the four x sections from four different fabrics, giving it a scrappy look. Here it is finished on the card table. Below is a picture with the afternoon sun shining through. :) 


Linking up to Sew Modern Monday and Manic Monday