Wednesday, July 25, 2012

A stitch in time

The San Francisco airport has a nice exhibit of historical pieces related to sewing. We had a lot of time before our flight last week, so we meandered past the cases and took in the sights on the way to our gate.

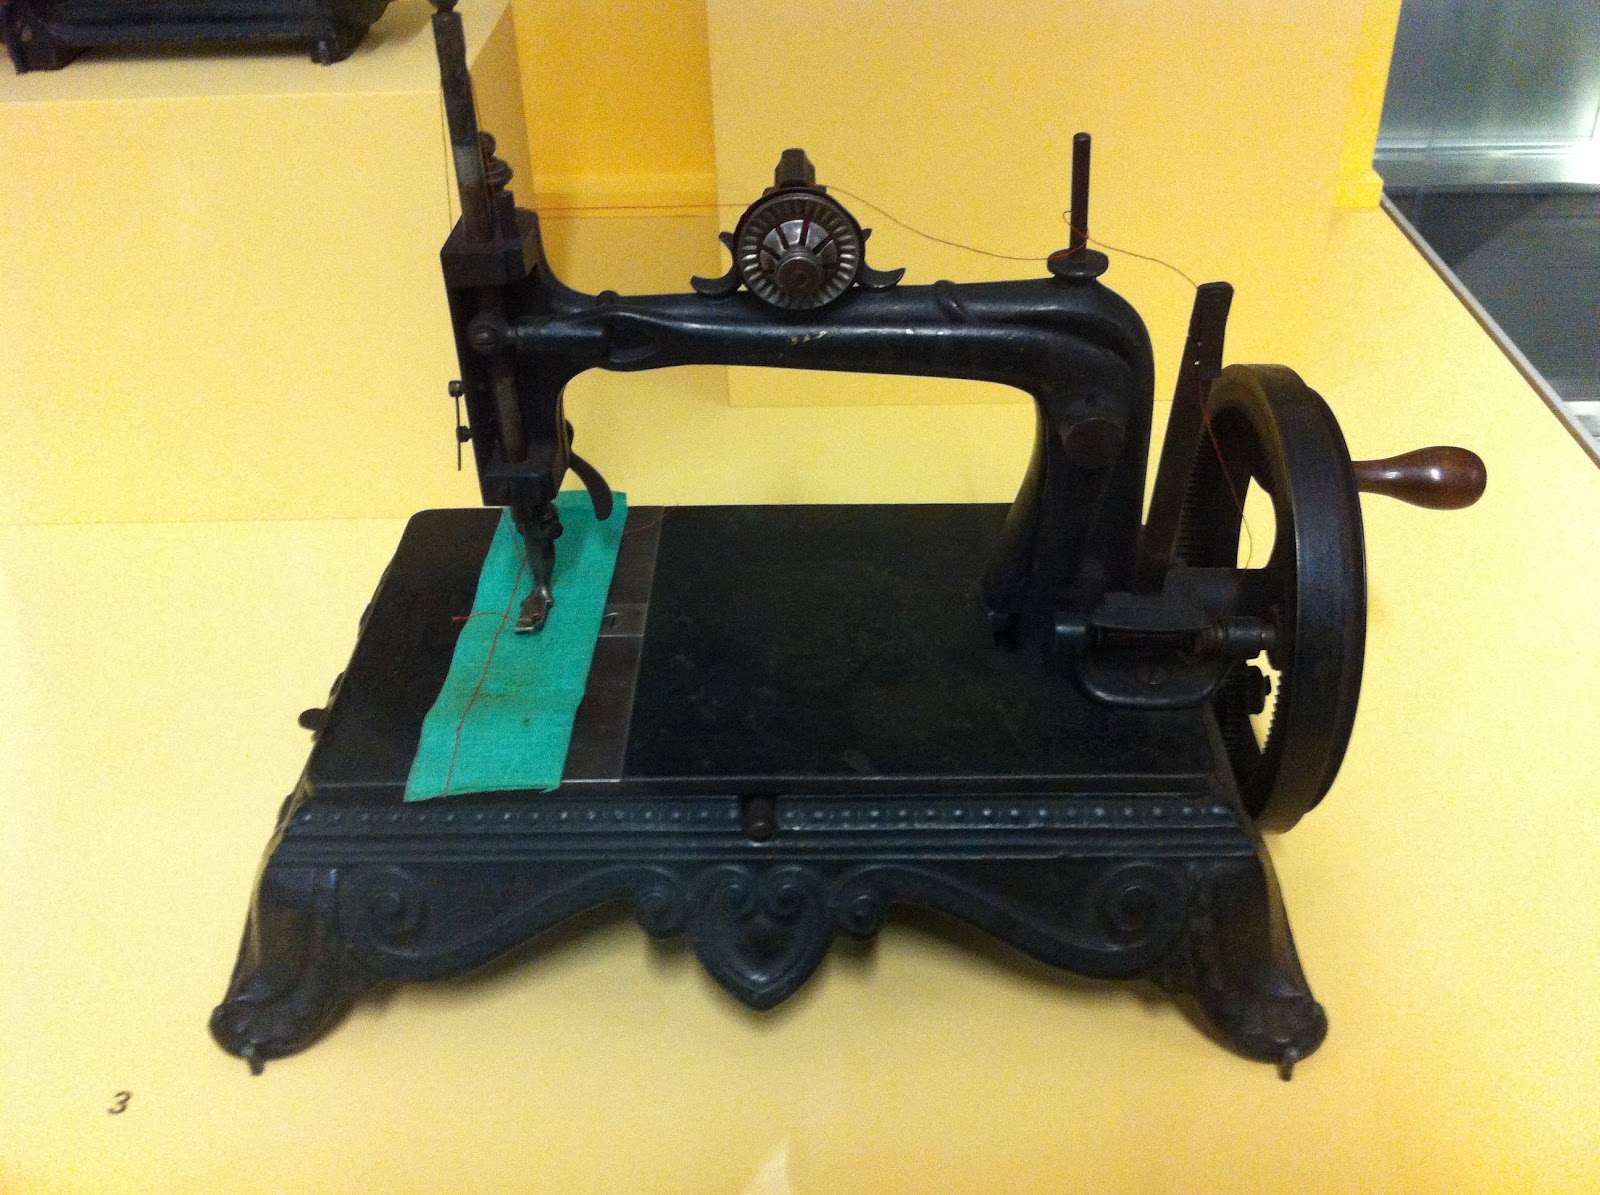
The first models were hand crank - imagine! Also, they are beautifully made, just look at those scrollwork details. They sure don't make them like that anymore. It was funny how as we progressed in time the machines got less ornate then finally (in the 70s) were transitioned totally to plastic boxes. Sigh.


The old models had such inventive names like 'Sewmaster de luxe'. Singer recently came out with an anniversary machine that looks something like this one.


See that ad in the background? J&P Coats thread! I love the bird -- no ads like that for sewing supplies anymore.


Further down we saw these adorable little toy machines. The banner in the background is precious: "Sewing without Mother's help" (who would want to?!). They were probably no bigger than an iPad in footprint - pretty small!


And look at these notion holders! Oh my gosh they're cute. I guess I'd have to get past the notion of it looking like stabbing a bird in the head with scissors... but they really are quite inventive.


One last thing to share: "The Wonderful McDowell Garment Drafting Machine". The idea is that based on someone's measurements you can adjust all the bars by loosening screws keeping them in place, and then be able to cut out a pattern that will be custom fit for them. How cool.


I'm not sure how much longer this exhibit will be up in the airport, but if you come through SFO I'd recommend taking the time to look at all the neat things on display.

Monday, July 23, 2012

A wee bit o' quilting

My oh my! This quilt is coming along so nicely I might not want to give it away! Well I'm kidding of course, it will be leaving my hands when finished, but I am enjoying this one a lot.


I managed to piece a backing (which I made an inch too small, darn it!), pin baste, and quilt this guy all in one evening. I am crafty, hear me roar. Seriously it was quite an evening. I learned a few things:

Lesson #1: Be sure to smooth out quilt top really well before using it to gauge how big backing needs to be. Especially on carpet.

Lesson #2: I wish we had our hardwood floors back so I could tape the backing down and keep everything nice and taut while basting. It works out on carpet ok, but I'd still feel better.

Lesson #3: Yeah for the longest stitch length on my sewing machine. FAST.

The quilting is simple, but I think this simple top should have simple quilting. I used diagonal lines through the linen squares, leaving the prints alone and alternating gray and yellow thread. This creates a nice pattern framing the blocks of prints and adding some interest with the different colors. Some blocks have a gray X, some a yellow X, and the rest have one gray and one yellow cross bar. Neat.


All that's left is the binding. The cupcake is sitting on the shelf all ready to go! When we get back from vacation that's my first order of business at the card table.

Friday, July 20, 2012

Hexie Tree

After I finished the front of my hexie tree tote bag from class it hung around in my sewing room for a week or so. I wasn't sure how I wanted to finish it, but it was a great temporary decoration. 


This past weekend I sat down and finished the bag construction which I must say was a breeze. This will be a great go-to pattern for all types of designs. I chose to keep it simple and use a brown solid for the inside and the same green canvas pieced together for the back. Since the canvas is heavier than a quilting cotton, I decided not to go for the fusible fleece interfacing. The bag is fluid, but still has some nice structure. 


For the strap I found a striped twill-ish fabric in my scrap bag. This fabric was from napkins I bought years ago and made into pillow covers for my living room back when we had mostly green and blue going on. The colors are a perfect match to all these hexagons and a great complement to the tree design with all the brown and green. Yeah for finding the perfect use for those odd strips of fabric!


This was a really fun project that I will probably do some more -- I can imagine changing up the design on the front using different kinds of EPP shapes or even some applique now that I have a nice, simple pattern for a tote.

Thursday, July 19, 2012

Weathering the Storm at Sea


Round 3 of the quilt is finished! Four Storm at Sea blocks and 120 2-inch squares later this quilt is really starting to take shape. I have two different versions of the corner blocks, two of each. These were challenging for me, hence the post name. I do feel a bit like I've weathered a storm and have come out on the other side having learned a lot. My seam ripper and I are friends, and I now know how to paper piece using my machine. (I have a couple of paper pieced blocks I can't wait to tackle now!)


I fussy cut a few of the pieces in each block; the toile diamonds have vignettes of people, the yellow Hope Valley print leaves were perfect for the smallest square, and my two orange prints have great little sunbursts in them. The more I practice the better I'll get at getting fussy cuts all lined up, but I think for my first stab at foundation paper piecing this isn't bad. The second block with all the blues is my favorite because I love the combination of the pezzy blue, linen, and that orange print in the large square. I'll have to save this idea for another quilt maybe? (I should probably stock up on the pezzy print while I can!)

This round also had four panels of patchwork solids. The fabrics I included in the patchwork are not all cotton, which adds a nice bit of texture; the black and gray are corduroy, the beige and blue are linen, and the olive-y green is twill. Yay for stash/scrap busting.


At first I was a little concerned that the patchwork was too bold and was outcompeting both the Storm at Sea blocks and the center. One great thing about taking this handstitched class is the group of people I've connected with. My classmates (and instructor!) have been fantastic with their comments on every project but most especially this one. Their objective eyes have been invaluable in helping me see that this is working just fine. You know if you stare at something too long everything starts looking wrong? Yeah. Walking away for a few days did great wonders.

I am just loving how this is turning out. I will be behind on this the next two weeks because I'm away from my sewing machine and much of the next round is machine sewn, but I'm sure my enthusiasm will help me catch up in no time when I get back.

Monday, July 16, 2012

Industrial Revolution

The industrial revolution brought many great inventions to automate tasks otherwise done by hand, but none more enchanting and useful than the sewing machine. Ok I might be exaggerating a bit, but I love my Singer.

The past couple weeks I have been working on the next round of my handstitched class quilt which includes a round of patchwork anchored at the corners by Storm at Sea blocks. The technique of the week is english paper piecing. I had my first taste of EPP earlier this year in the form of a single star blossom block I made just to see what it was like. I enjoyed it, and was happy to get a chance to revisit the technique as part of this quilt.


This time around, it proved a little bit more challenging for me, partly because there are smaller pieces, but mostly because of the extreme acute angles on the small pieces. The toughest part I think are those eight green triangles surrounding the diamonds. I had a hard time being happy with the way my seam allowances were laying/being stretched as I basted. This may have had something to do with my fabric choices -- they aren't all quilting cottons. 


I managed this first part of the block just fine, enjoyed it even. The next three parts were not quite as enjoyable, but I finished it. I did realize however that in order to finish the other three blocks and the rest of this part of the quilt in the time I had available before the next set of lessons I was going to have to pick up the pace. My sewing time these few weeks hasn't been that abundant, so I decided to teach myself how to foundation paper piece. 

Foundation paper piecing uses a machine rather than hand sewing, and rather than wrapping fabric around the individual paper pieces, fabric is sewn directly to the larger intact pattern. I ended up using this tutorial to get the general idea of how it all works, then just diving in! Thankfully these are actually pretty simple blocks to piece this way; not even a y-seam in sight. There are a few geometrical acrobatics that gave me problems when trying to do those long triangles on the diamonds, but I just made friends with my seam ripper and persevered until I figured it out. 


I will still enjoy EPP when I have larger pieces to work with, but for anything with small bits or small angles, I think we'll go one letter farther down the alphabet and use FPP. 

Monday, July 9, 2012

Skirt on a whim

When we went to Portland at the end of May, I scored some awesome fabric. One of those finds was the print that turned into this skirt that I promised myself to make because I wanted an excuse to buy some. This is one promise-to-self that I've kept; super proud.


The bolt was in a section of random 72" wide cottons and, considering the colors, had my name written all over it. Half of it was this pretty tribal border print, and the other half was just the smaller print continued to the other selvage. I literally took it off the shelf and started wrapping it around my waist trying to figure out how much I needed for a knee-length skirt. Dave laughed, and so did I. 


All I did for this skirt was sew the length into a tube, put in some pleats and a small waist band, and add a zipper at the seam. It sat for a few days while I considered how best to hem it until the day came when I wanted to wear it. Then I tossed all thoughts of being careful aside and hemmed it by folding up the selvage edge about 3 inches for a wide band on the inside to finish. I was worried about how it would hang after hemming, but it's just fine, no extra stiffness in the hem. I think this is because it's so wide. 

This all sounds very 'simple' until I explain that I had to try it on many times to figure out where to put the pleats and how far down to sew them closed. Also, by pure serendipity, the pleats in the back are not zigzagged as the front ones are (shown above) to help with fit, but this also happens to make the skirt roomy enough back there (ahem) so it hangs evenly front and back when I wear it. In the end I wish I had written down what I did as I went along, but it was one of those things where I was winging it and made and corrected so many mistakes that I probably couldn't repeat it if I tried. Ah well, a one of a kind, then. 


And it fits! (Kind of an odd angle, but it's just below the knee.) This was my first actual clothing finish for myself that has ended up fitting and I've worn. And I love it. The bonus? I didn't need the whole width of the fabric, so I have a nice amount of the cute little print left to play with. Aren't those colors great????

Saturday, July 7, 2012

Tree hugging

This week's topic in handstitched class is English paper piecing. I had my first adventure with this technique earlier this year with a single star blossom quilt block inspired by a project on Rachel's blog. How nice is it that it's all circled around and I'm now taking a class with her? 

The project I chose to do in addition to the next round on my class quilt is a tote bag. There isn't a whole lot of EPP in this, but it makes up for that in awesomeness. Thursday night it was 'guys night' at our place, so I got to hole up in the sewing room and enjoy some undisturbed time to myself while listening to the comments of four grown men playing a video game. It was hilarious, and relaxing (and also not super well lit). 


I picked out fabrics, traced, basted, and pressed -- quite a lot for one evening!


I also got the tree trunk and branches stitched, the paper piecing done, and my canopy layout all planned. I took this photo so I remember where everything goes. And if that wasn't enough, I got about two thirds of the hexagons sewn down. Go me! I'm hoping to work on the quilt some this weekend, so this might sit for a few days while I ponder lining fabric and a layout for the back of the bag.

Friday, July 6, 2012

Fresh Sewing Day July

I'm starting something new. I've been wanting to keep track of all the projects I have been making, and have now gotten around to finding a good place to make picture collages (picmonkey). The first weekend of every month I'm going to post a collage of what I finished the month prior. It will be a fun way to share and also look back on projects that may have found their way out of the house. 

So here's June in a nutshell!


I'm linking up at Lily's Quilts for Fresh Sewing Day -- check it out! Every 1st of the month there's a link up to show what's been up for the last month. Great idea! She also has a link list for small blogs that I'll be joining and looking through. New sites to visit are always fun. 

Lily's Quilts   Lily's Quilts

Thursday, July 5, 2012

Embroidery accomplishment

I finished the embroidery on my class quilt-in-progress. I'm so excited to be finished! The hand stitching was fun and I think it adds a lot to the whole project. There are running stitch and backstitch triangles alongside satin stitch clovers in all the colors I plan to use in the rest of the quilt. Here is what I started with, and here is where I ended:


I have never used transfer paper before this, pretty much just pencil on fabric (if anything). Wow! We got some Saral transfer paper (red and graphite) in our class kits and it worked like a charm. I am a convert. The lines turned out bright and clear with minimal pressing while tracing. I was concerned after I made a few errors in centering, but no problems; after some time and handling the lines faded away.

The biggest challenge I had was keeping the satin stitches registering straight with each other on the linen. I was trying to use the weave of the fabric to keep myself in line, but sometimes it was off kilter. It all worked out in the end though, and I don't expect anyone to be staring at it all that closely. That said, here are a couple close ups...


I can vouch that in this case tracing the pattern was a must. I started out free-handing a couple of these clovers and it was a) slow b) uneven and c) just plain miserable. I tore one out, left one in (see if you can guess which of the 8 it is!) and followed instructions. 

I continue to be happy with how this quilt is coming along, next step: patchwork and storm at sea blocks!