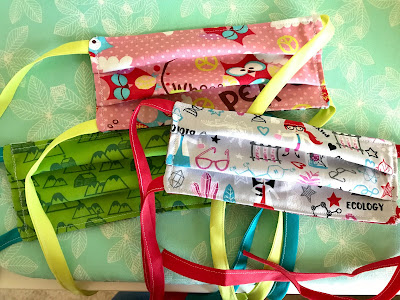
I’ve mainly been sticking to the tie back masks because I will get rubs behind my ears just from thinking about putting elastic back there. There have been times that it would have been really nice to not have to stop and tie up, though, so I made each of us one with elastic for those quick on/off situations. For those I used a pattern that was super simple to make from a couple rectangles of fabric. The pattern I’ve used most is one my mom shared with me and requires the extra step of tracing a template out and a few more seams to get the face-shaped mask. Both work just fine on us.
For the tie backs, I’ve been using Wright’s double fold bias binding. They’re pretty inexpensive and come in lots of cool colors. The real bonus is that they are already ironed. I could (and probably will) definitely make my own ties from strips of fabric but the appeal of not having to iron those long skinny strips is so great. I did goof on the purple binding, though. Notice how it’s much skinnier? It’s important to make sure your package of bias binding says “extra wide” double fold. To be perfectly honest, the skinny one worked out just fine but I think it has more grip on my head if it’s the wider tape.
My first ties were kind of ad hoc and pretty random based on the length of the strips I had in my stash already. There was pretty much no thought that went into it. After looking at several patterns and their approaches I’ve decided my go-to is this: use a 9-inch strip and tie into a loop with a square knot; hide the knot in the side channel on the mask; use an 18-inch strip on each side and attach to the loops by folding over a small tab and sewing it down so it loops freely over the first piece. The side loop provides some pull back both “up” and “down” on the sides so the mask doesn't bunch up weird and the fold-over tab attachment approach for the side ties means they can move up and down as they need to in order to fit best with whatever hat/ponytail etc. it has to get around to tie securely. It also means you use 1.5 yards of the binding for each mask which gives you 2 masks from each 3 yard package.
This set here with the double ties is for a friend’s daughter. She wasn’t feeling very positive about wearing a mask as she gets to go out into the world a bit more in the coming weeks, but said if she could have one that was basically the same as the ones her nanny wears then she’d try it. Ta da! They took more binding, more like 2 yards each, but turned out super and were quick to make as well. These ties are sewn directly into the seams of the mask. I’ve also seen versions where the binding is sewn directly across the top and bottom of the mask to enclose that seam, too. I’m hoping these will make wearing a mask a little more approachable, and I love that I can share my girl science fabric with her.
Dave and I make quite the pair when we are out and about with our bright fabric faces, but why not try to make this as bearable as possible? The way I see it, at least we can each get a chuckle together as we don our masks and step out of the car or peek around the grocery aisle to recognize the sushi face at the other end.


No comments:
Post a Comment
Thanks for chiming in and leaving a comment!